#Android Custom ListView with Images
Explore tagged Tumblr posts
Visit Tumblr Blog
Explore Tumblr blogs with no restrictions, modern design and the best experience.
Last Seen Tumblr Blogs


Fun Fact
Tumblr posted its first advertisements in May 2012 and subsequently earned $13M in revenue.
Text
A Comprehensive Guide to Flutter App Development
Flutter, Google's UI toolkit, has revolutionized cross-platform mobile app development. Its ability to create beautiful, natively compiled applications for mobile, web, and desktop from a single codebase has captured the hearts of developers worldwide. But where do you begin? This blog post aims to provide a comprehensive overview of Flutter app development, from the basics to advanced concepts.
Read: Top 10 Benefits of Using Flutter for Your Project
1. What is Flutter and Why Choose It?
Flutter is an open-source UI software development kit created by Google. It uses the Dart programming language and provides a rich set of pre-built widgets for creating visually appealing and high-performance applications.
Key Advantages:
Cross-Platform Development: Write code once and deploy it on iOS, Android, web, and desktop.
Hot Reload: See changes instantly without restarting the app, significantly speeding up development.
Rich Widget Library: Flutter's extensive library of customizable widgets allows for stunning UI designs.
Native Performance: Flutter apps are compiled to native code, ensuring optimal performance.
Growing Community: A large and active community provides ample support and resources.
2. Setting Up Your Flutter Environment:
Before diving into coding, you need to set up your development environment. This involves:
Installing the Flutter SDK.
Setting up an IDE (Integrated Development Environment) like VS Code or Android Studio with the Flutter and Dart plugins.
Configuring emulators or physical devices for testing.
3. Understanding the Flutter Architecture:
Flutter's architecture is built around widgets. Everything in Flutter is a widget, from buttons and text fields to entire screens.
Widgets: The basic building blocks of the UI.
Dart: Flutter's programming language, known for its speed and efficiency.
Rendering Engine: Flutter uses Skia, a 2D graphics library, to render UI elements.
Platform-Specific Layers: These layers handle platform-specific functionalities.
4. Building Your First Flutter App:
Let's break down the basic structure of a Flutter app:
main.dart: The entry point of your application.
MaterialApp: A widget that sets up the app's theme and navigation.
Scaffold: Provides a basic app structure with an app bar, body, and floating action button.
Widgets: Text, buttons, image, listviews etc.
Example of a simple "Hello World" app:
Dart
import 'package:flutter/material.dart';
void main() {
runApp(MyApp());
}
class MyApp extends StatelessWidget {
@override
Widget build(BuildContext context) {
return MaterialApp(
home: Scaffold(
appBar: AppBar(
title: Text('Hello World'),
),
body: Center(
child: Text('Hello, Flutter!'),
),
),
);
}
}
5. State Management:
State management is crucial for building complex apps. Flutter offers several state management solutions:
setState(): For simple state changes within a single widget.
Provider: A popular package for managing app-wide state.
Bloc (Business Logic Component): A pattern for managing complex state and business logic.
Riverpod: A reactive caching and data-binding solution.
6. Navigation and Routing:
Flutter provides robust navigation tools for managing screen transitions:
Navigator: Used to push and pop routes.
Named Routes: For defining and navigating to routes using strings.
Navigation 2.0: A declarative API for more complex navigation scenarios.
7. Working with APIs and Data:
Most apps require fetching data from external APIs. Flutter provides tools for handling network requests:
http package: For making HTTP requests.
dio package: A powerful HTTP client with interceptors and other advanced features.
FutureBuilder and StreamBuilder: Widgets for handling asynchronous data.
8. Advanced Flutter Concepts:
Animations: Flutter's animation framework allows for creating smooth and engaging UI animations.
Custom Widgets: Building reusable custom widgets to enhance your app's UI.
Plugins and Packages: Leveraging the vast ecosystem of Flutter packages to add functionality.
Testing: Writing unit, widget, and integration tests to ensure app quality.
Deployment: Building and deploying your Flutter app to various platforms.
9. Continuous Learning and Resources:
The Flutter ecosystem is constantly evolving. Stay updated with the latest trends and best practices by:
Following the official Flutter documentation.
Exploring Flutter community forums and blogs.
Taking online courses and tutorials.
Contributing to open-source Flutter projects.
Conclusion:
Flutter offers a powerful and efficient way to build cross-platform applications. By understanding the fundamentals and continuously learning, you can unlock the full potential of this incredible framework. Happy coding!
Need Expert Flutter Development?
If you're looking to build a high-quality, cross-platform Flutter application, but don't have the in-house expertise, we can help. Hire our experienced Flutter developers to bring your vision to life.
At Getwidget, we specialize in creating robust and scalable Flutter apps tailored to your specific needs.
Contact Us
Must check out: IoT-Driven Projects Using Flutter: A Comprehensive Guide
0 notes
Text
Understanding Flutter Widgets: The Building Blocks of UI

Introduction
Flutter has rapidly emerged as one of the most popular frameworks for cross-platform app development. Known for its fast development cycle, beautiful UI components, and seamless performance, Flutter is widely adopted by developers worldwide. At the core of Flutter’s functionality lies its powerful widget-based architecture.
Whether you are building a simple application or a complex one, Flutter widgets play a crucial role in shaping the user interface (UI). In this article, we will explore what Flutter widgets are, their types, and why they are essential for app development. If you’re looking to master Flutter development, consider Flutter Training in Chennai, which provides hands-on experience in building UI with widgets.
What Are Flutter Widgets?
A widget in Flutter is a UI component that controls a part of the screen. Every UI element in a Flutter app, from a simple button to a complete screen layout, is made up of widgets. Flutter follows a widget tree structure, meaning widgets are nested within each other to create complex user interfaces.
Why Widgets Are Important in Flutter
Reusability – Widgets can be used multiple times across different parts of the app.
Customization – Widgets allow developers to create unique UI experiences.
Hot Reload – Changes made to widgets can be instantly reflected in the app.
Cross-Platform Development – Widgets enable seamless UI creation for Android, iOS, web, and desktop.
Types of Flutter Widgets
Flutter offers a rich set of widgets that developers use to build stunning interfaces. These widgets are primarily classified into two categories: Stateless Widgets and Stateful Widgets.
1. Stateless Widgets
Stateless widgets are immutable, meaning their properties do not change once they are created. They are used when the UI does not require updates based on user interaction or dynamic data changes.
Examples of Stateless Widgets:
Text Widget – Displays text on the screen.
Image Widget – Loads images from assets, network, or file.
Icon Widget – Displays icons from Flutter’s icon library.
RaisedButton – A simple button with elevation.
2. Stateful Widgets
Stateful widgets are dynamic and can change based on user interactions, API responses, or other factors. They maintain a state that can be modified during the app’s lifecycle.
Examples of Stateful Widgets:
TextField – Accepts user input dynamically.
Checkbox – Allows toggling between checked and unchecked states.
Slider – Provides a sliding control for setting values.
ListView – Displays a scrollable list of widgets.
Key Flutter Widget Categories
Apart from Stateless and Stateful widgets, Flutter provides several widget categories to enhance app development.
1. Layout Widgets
Layout widgets help structure the UI elements effectively.
Column – Arranges widgets vertically.
Row – Arranges widgets horizontally.
Stack – Overlaps widgets on top of each other.
Container – Provides padding, margins, and background properties.
2. Input Widgets
These widgets facilitate user interaction.
TextField – Enables text input.
DropdownButton – Displays a list of selectable options.
Switch – Toggles between on/off states.
3. Styling Widgets
Styling widgets enhance the visual appearance of the UI.
Padding – Adds space around a widget.
Align – Aligns widgets within their parent container.
DecoratedBox – Applies decorations like colors, gradients, and borders.
4. Scrolling Widgets
Scrolling widgets help manage content overflow.
ListView – Creates a scrollable list.
GridView – Arranges widgets in a grid format.
SingleChildScrollView – Allows a single widget to be scrollable.
5. Interactive Widgets
These widgets enable user interaction.
GestureDetector – Detects gestures like taps and swipes.
InkWell – Provides visual feedback on touch.
FloatingActionButton – A button that performs primary app actions.
How Flutter Widgets Improve UI Development
1. Faster Development with Hot Reload
One of the biggest advantages of Flutter’s widget system is Hot Reload, which allows developers to instantly see the changes they make without restarting the app.
2. Consistent UI Across Platforms
Flutter widgets ensure a native-like UI experience across Android, iOS, web, and desktop platforms, making cross-platform development seamless.
3. Customization and Theming
Flutter allows extensive customization of widgets through properties like colors, shapes, and animations. Themingenables developers to apply a consistent design across the app.
Future of Flutter Widgets
As Flutter continues to evolve, its widget ecosystem is expanding with new features and optimizations. Some trends in Flutter widget development include:
Adaptive Widgets – Widgets that adjust automatically based on the platform.
Flutter Web Widgets – Enhancing Flutter’s web development capabilities.
Enhanced Performance Widgets – More efficient state management and rendering improvements.
Conclusion
Flutter widgets are the core foundation of UI development, enabling developers to create stunning, responsive, and dynamic applications. Whether you are a beginner or an experienced developer, mastering Flutter widgets is essential for building robust applications.
If you’re looking to enhance your Flutter skills and become proficient in UI development, consider Flutter Training in Chennai. With expert-led training, hands-on projects, and real-world applications, you can accelerate your journey to becoming a skilled Flutter developer.
By understanding and effectively utilizing Flutter widgets, you can unlock the full potential of cross-platform app development and deliver high-quality applications effortlessly.
0 notes
Text
Android Custom ListView with Images
Android Custom List View with Images
What will you learn in Android Custom ListView with Images tutorial? In the last tutorial by Buzzmycode, you had learned about Listview, the basic way of using listview in android. Now in this tutorial, I will explain how to use images and text data in the listview, the data will be static. Here static means the data will not be fetched from the server (MySql /JSON). To know the crude of android…

View On WordPress
#android#android app develop#android app development ide#Android Apps#android apps list view#Android Custom ListView App Layout#Android Custom ListView with Images#Android Custom ListView with Images tutorial#android listview#Android Studio#android studio listview example#how to create custom listview in android#listview example in android#listview in android example
0 notes
Text
Sqlite For Mac Os X

Sqlite For Mac Os X El Capitan
Sqlite Viewer Mac
Sqlite Mac Os X Install
If you are looking for an SQLite Editor in the public domain under Creative Commons license or GPL (General Public License) i.e. for free commercial or non-commercial use. Then here is a shortlist of the SQLite Editor that is available on the web for free download.
SQLite is famous for its great feature zero-configuration, which means no complex setup or administration is needed. This chapter will take you through the process of setting up SQLite on Windows, Linux and Mac OS X. Install SQLite on Windows. Step 1 − Go to SQLite download page, and download precompiled binaries from Windows section. Core Data is an object graph and persistence framework provided by Apple in the macOS and iOS operating systems.It was introduced in Mac OS X 10.4 Tiger and iOS with iPhone SDK 3.0. It allows data organized by the relational entity–attribute model to be serialized into XML, binary, or SQLite stores. The data can be manipulated using higher level objects representing entities. Requirements: Free, ideally open source Browse schema, data. Run queries Bonus if updated in near real time when the file is. SQLite viewer for Mac OS X. Ask Question Asked 5 years, 10 months ago. Active 4 years, 3 months ago. Viewed 504 times 3. I need to inspect an SQLite file on Mac. Since I develop on Windows, Linux and OS X, it helps to have the same tools available on each. I also tried SQLite Admin (Windows, so irrelevant to the question anyway) for a while, but it seems unmaintained these days, and has the most annoying hotkeys of any application I've ever used - Ctrl-S clears the current query, with no hope of undo.
These software work on macOS, Windows, Linux and most of the Unix Operating systems.
SQLite is the server. The SQLite library reads and writes directly to and from the database files on disk. SQLite is used by Mac OS X software such as NetNewsWire and SpamSieve. When you download SQLite and build it on a stock Mac OS X system, the sqlite tool has a.
1. SQLiteStudio
Link : http://sqlitestudio.pl/
SQLiteStudio Database manager has the following features :
A small single executable Binary file, so there is need to install or uninstall.
Open source and free - Released under GPLv2 licence.
Good UI with SQLite3 and SQLite2 features.
Supports Windows 9x/2k/XP/2003/Vista/7, Linux, MacOS X, Solaris, FreeBSD and other Unix Systems.
Language support : English, Polish, Spanish, German, Russian, Japanese, Italian, Dutch, Chinese,
Exporting Options : SQL statements, CSV, HTML, XML, PDF, JSON, dBase
Importing Options : CSV, dBase, custom text files, regular expressions
UTF-8 support

2. Sqlite Expert
Link : http://www.sqliteexpert.com/download.html


SQLite Expert though not under public domain, but its free for commercial use and is available in two flavours.
a. Personal Edition
Sqlite For Mac Os X El Capitan
It is free for personal and commercial use but, covers only basic SQLite features.
But its a freeware and does not have an expiration date.

b. Professional Edition
It is for $59 (onetime fee, with free lifetime updates )
It covers In-depth SQLite features.
But its a freeware and does not have an expiration date.
Features :
Visual SQL Query Builder : with auto formatting, sql parsing, analysis and syntax highlighting features.
Powerful restructure capabilities : Restructure any complex table without losing data.
Import and Export data : CSV files, SQL script or SQLite. Export data to Excel via clipboard.
Data editing : using powerful in-place editors
Image editor : JPEG, PNG, BMP, GIF and ICO image formats.
Full Unicode Support.
Support for encrypted databases.
Lua and Pascal scripting support.
3. Database Browser for SQLite
Link : http://sqlitebrowser.org/
Database Browser for SQLite is a high quality, visual, open source tool to create, design, and edit database files compatible with SQLite.
Database Browser for SQLite is bi-licensed under the Mozilla Public License Version 2, as well as the GNU General Public License Version 3 or later.
You can modify or redistribute it under the conditions of these licenses.
Features :
You can Create, define, modify and delete tables
You can Create, define and delete indexes
You can Browse, edit, add and delete records
You can Search records
You can Import and export records as
You can Import and export tables from/to text, CSV, SQL dump files
You can Issue SQL queries and inspect the results
You can See Log of all SQL commands issued by the application
4. SQLite Manager for Firefox Browser
Link : https://addons.mozilla.org/en-US/firefox/addon/sqlite-manager/
This is an addon plugin for Firefox Browser,
Features :
Manage any SQLite database on your computer.
An intuitive hierarchical tree showing database objects.
Helpful dialogs to manage tables, indexes, views and triggers.
You can browse and search the tables, as well as add, edit, delete and duplicate the records.
Facility to execute any sql query.
The views can be searched too.
A dropdown menu helps with the SQL syntax thus making writing SQL easier.
Easy access to common operations through menu, toolbars, buttons and context-menu.
Export tables/views/database in csv/xml/sql format. Import from csv/xml/sql (both UTF-8 and UTF-16).
Possible to execute multiple sql statements in Execute tab.
You can save the queries.
Support for ADS on Windows
Sqlite Viewer Mac
More Posts related to Mac-OS-X,
More Posts:
Sqlite Mac Os X Install
Facebook Thanks for stopping by! We hope to see you again soon. - Facebook
Android EditText Cursor Colour appears to be white - Android
Disable EditText Cursor Android - Android
Connection Failed: 1130 PHP MySQL Error - MySQL
SharePoint Managed Metadata Hidden Taxonomy List - TaxonomyHiddenList - SharePoint
Execute .bin and .run file Ubuntu Linux - Linux
Possible outages message Google Webmaster tool - Google
Android : Remove ListView Separator/divider programmatically or using xml property - Android
Unable to edit file in Notepad++ - NotepadPlusPlus
SharePoint PowerShell Merge-SPLogFile filter by time using StartTime EndTime - SharePoint
SQLite Error: unknown command or invalid arguments: open. Enter .help for help - Android
JBoss stuck loading JBAS015899: AS 7.1.1.Final Brontes starting - Java
Android Wifi WPA2/WPA Connects and Disconnects issue - Android
Android Toolbar example with appcompat_v7 21 - Android
ERROR x86 emulation currently requires hardware acceleration. Intel HAXM is not installed on this machine - Android
1 note
·
View note
Text
React.js vs React Native – What's the Difference? - Arya College
What are React and React Native?
What is React:-
React is a UI *library* developed at Facebook.
Every component has a state object and a props object.
React seems to rerender the whole app on every data change but it only ends up rerendering the parts that changed.
React Contents:-
JSX
Virtual-DOM
Props
PropTypes
State
Refs
LifeCycle
FlArchitectech
Routing
Functions & Objects:
GetInitialState – The return value is the initial value for the state.
SetState – Sets the state and triggers UI updates.
GetDefaultProps – Sets fallback props values if props aren’t supplied.
What is React Native:-
React Native is like React but instead of using web components that you build yourself… you use native components instead.
React Native allows you to use the same React concepts but instead build native iOS and Android applications.
There is also support for the Universal Windows platform and Tizen platform.
Styling for Native components
All components have a style prop that accepts a JavaScript object.
You can use StyleSheet.create() to create a more complex style sheet object that you can reference in your components
Handling Layout for React Native
Mobile viewports have fixed dimensions.
React Native allows you to use the flexbox algorithm to layout components, just like on the web*
Listview Component:-
Displays a vertically scrolling list of structured data.
Only renders elements currently on screen.
Extremely useful components that we will see in our demo
Networking in React Native:-
React Native provides the Fetch API for your networking needs.
React Native also supports WebSockets for full-duplex communication channels over a single TCP connection
Who is using React Native:-
Facebook
Instagram
Walmart
Airbnb
Skype
Baidu
Tesla
ADIDAS
Discord
Wix
Bloomberg
Jd.com
How it works:-
Seprate UI, Layout and Java Script
Threads communications
Java Script is bundled and minified using bable
React Native API:-
View
Text
Scroll view
Image
Text input
Switch
Advantages of React Native?
Fast speed Development
Low cost
Code reuse
Easier to find developers
Ship against Multiple platforms
Possible to ship over the app store/ Play store
Optimize Performace
Stability and Reliability
Ready Made Solutions
Plugin Support
Disadvantage:-
Difficult to Learn
Learning React Native can be very challenging, especially for freshers in app development who might find creating applications with JSX in the JavaScript syntax extension difficult.
Low Security
React Native is a JavaScript library and also an open-source framework, due to which developers often face the challenge of keeping the app secure.
Complex UI
According to many coders, React Native isn’t the right choice for apps that need complex gestures, screen transitions, animations, or require many interactions. Despite React Native having a gesture responder system, coders might continue to struggle with screens with complicated gestures.
Longer Initialization Time
Another problem coders have with React Native is that it takes longer to initialize the runtime before it can render properly the first time.
Memory Management
React Native is also not suitable for use in computation-intensive apps because it is based on JavaScript.
Difference Between React and React Native?
React and React Native are two popular choices for front-end development. React is a JavaScript library for building user interfaces, while React Native is a framework that allows us to create native mobile apps using JavaScript.
Conclusion
At Tech Exactly, our team of highly skilled and experienced developers has delivered high-performance applications built with React Native and React helped businesses offer an excellent experience to their customers and meet their business objectives,
After shedding some much-needed light on the pros and cons of React and React Native, it is vital to remember a few things. React Native can help businesses make high-quality and scalable mobile apps with attractive and responsive UI and deliver an excellent native app user experience to their customers.
Other than the user experience the benefits and features offered are immense. There is code reusability, the creation of a community of expert developers, along with developers getting access to a range of pre-created elements, and many more, all of which comparably aid the developers in reducing the time and costs of the projects.
But it also has many drawbacks, and since it’s relatively new and improving, many developers choose not to use it when making certain complex apps. One should note, however, that the community of React Native developers is growing every day, so, its shortcomings are also improving, and the collection of components is also increasing. Soon, the advantages of React Native app will outstrip its drawbacks. In the future, React Native will be used to build apps requiring more advanced functionalities, and safety features, and it will soon become the popular choice among app developers everywhere.
0 notes
Text
Free Focus Stacking Software For Mac
Automatic focus bracketing android app for phone camera
Zerene Stacker Vs Helicon Focus
Best Focus Stacking Software 2020
Free Focus Stacking Software For Mac
I am trying to look for an android app to automatically take focus bracketed photos with my smartphone. I am looking for the best way to make my Galaxy S7 phone with tripod automatically take a user-defined number of photos along a user-defined range of focus, that are ready to be imported into a focus stacking software like PS or Zerene Stacker WeMacro's automatic focus stacking rail has total travel length of 100 mm. It's minimum step can be set as 1 micron in precise mode. The rail is fully controlled by a computer, or an android phone using Bluetooth or OTG functionality. iPhone's app is available in the App Store! Search WeMacro and you will find it Yesterday, I finally took some time to look for focus stacking apps that will work on my Google Pixel 2 XL - an Android OS phone (Google invented Android OS). I was looking for an app that generally did what Nikon's full-frame D850 does with its focus stacking feature Android/Mobile Focus Stacking. Hi all! I am trying to find an android focus stacking app. Not sure it is possible yet because I can't seem to find anything that will take manual or auto focused shots, align them, and stack all from a mobile device FocusStacker is designed for use in landscape and architectural photography. In its speed, elegance and accuracy, it fits the needs of professional photographers, who'll be happy to know that at its heart lies the sophisticated optimization algorithm originally developed for the OptimumCS-Pro app, adapted here to the taking of multiple shots
. Rule600 calculator. Sky stacking helper. Custom profiles. Remote control over wireless network (Android devices must be on same network Picolay is a focusstacking software with multiple uses. It can perform image processing, create slide shows, make animated GIF images, and more I am developing a piano app, currently I am working on something to make my buttons play their sounds while user slides his finger over them. To achieve this, I've chosen onFocusChangeListener. It is not the part, in which i am adding sounds into, but right now i am to make buttons work as an example. Unfortuntely, I have got a couple of errors Classic Focus Stacking App. Classic focus stacking is the method of capture used by the original CamRanger. It is also an option with CamRanger mini and CamRanger 2, and can be turned on or off from within the app settings. Sony cameras can only use classic focus stacking, most notably all Sony cameras. Near and far positions are not set
When it comes to controlling your camera, the CamRanger 2 software is available on Android, iPad/iPhone, MacOS, and Windows platforms. Install the app on your phone, tablet, or desktop and gain control of your camera to fine tune focus from up to 500 feet away from your CamRanger 2 but I'm not able to give this focus. I tried with FocusScope -> Listview - > focus node but it is not giving exact behaviour in first and last index, and also it's not working in the homepage where multiple listviews are there. android flutter listview focus android-tv. asked 2 mins ago. Aviraj Patel During a transient loss of audio focus, you should continue to monitor changes in audio focus and be prepared to resume normal playback when you regain the focus. When the blocking app abandons focus, you receive a callback (AUDIOFOCUS_GAIN). At this point, you can restore the volume to normal level or restart playback. Permanent loss of focus
By shooting multiple photos at different focus distances and then combining them, the app allows users to capture images with a greater depth of field than a single iPhone snap may allow. After.. Android Apps/Applications Mobile Development. This example demonstrates how do I bring an activity to the foreground (top of stack) in android. Step 1 −Create a new project in Android Studio, go to File ⇒ New Project and fill all required details to create a new project. Step 2 − Add the following code to res/layout/activity_main.xml The description of StackOverflow App. Founded in 2008, Stack Overflow is the largest, most trusted online community for developers to learn, share their knowledge, and build their careers. More than 50 million professional and aspiring programmers visit Stack Overflow each month to help solve coding problems, develop new skills, and find job. When the user touches an icon in the app launcher (or a shortcut on the Home screen), that app's task comes to the foreground. If no task exists for the app (the app has not been used recently), then a new task is created and the main activity for that app opens as the root activity in the stack
Hugin is a free panorama stitcher that also includes Focus Stacking - it runs on Linux, Windows & Mac so no problems there. Facilities include alignment correction, so that if you are not using a tripod you can still stack without problems. To quote the manual. ImageJ is a free java application that can be freely downloaded from here, and also does focus stacking with imageJ extended depth field module. ImageJ is written in Java and runs on Linux, Mac OS X and Windows, in both 32-bit and 64-bit modes. Top free Landscape Design Software For Mac have been recorded underneath: 1. Live Home 3D Pro. Previous Article 7+ Best Free Focus Stacking Software 2021 List.
Wemacro Rail - focus stacking with wemacr
This tech stack for android app enables you to focus entirely on building high quality and unique apps. With help of the Android Developer Tools, you will be able to gain complete support for the whole Android app development process Photoshop Master Remakes a Masterpiece. Animal Instincts. Bring Out the Best In Your Photos with the New Lightroom for Mobile. The Dreamy, Long-Exposure Photos of Vassilis Tangoulis. free assets. Vintage-Look Photoshop Effects Pack. graphic design. Select part of an image to replace the background Focus Stacking viele Bilder aufnehmen mit verschiedenen Focuspunkten um ein durchgehend scharfes Bild zu erhalten. Die App kann dabei helfen die Aufnahmen zu.. DSLR Remote Control. DSLR Remote Control is the #1 downloaded app that will allow you to remote control and trigger your Canon or Nikon DSLR camera from your phone or tablet with a tethered USB OTG cable or wifi, turn your phone or tablet into a DSLR Controller today! See a live preview on your phone or tablet, adjust shutter speed, aperture.
How to use focus stacking to get sharper shots. 1. Choose your scene and stabilize the camera. Focus stacking requires layering several images over each other — a task that's much easier to do. Helicon Focus - Quick Start (Mac OS X) This short video will demonstrate how Helicon Focus is running on Mac OS - basic focus stacking workflow from opening of the images to saving of the output, useful tips and impressive stacking results. play video ability to automatically change the focus stacking direction at the end; show/hide for the LRTimelapse info display; various fixes; It is rolling out for Android right now. Windows changes: Added ability to use the UsbDK driver. With the UsbDK driver you don't need to install the WinUSB driver anymore for the camera
Programming languages: Java, Kotlin. For developing a native Android mobile app you can use Java or Kotlin. Java is a reputable programming language with vast open-source tools and libraries to help developers. However, Kotlin has become a more stable and congruous development option for Android Studio There is a free android app that allows you to manually adjust focus (and more camera technical stuff for photographers) Its called open camera and can be found on playstore. (the one by mark harman) NOTE: it will only work if your device supports it Focus stacking them in Photoshop would give me one combined frame with the entire watch in focus. As I began getting the frames needed to combine, I started by having the front part of the watch in focus, then gradually changed the focus from the front to the back After days of fiddling and googling I finally noticed that it depends on where the app is initially started from (meaning the first start from when it has been closed before). If I initially start it from the overlay, I can switch to it via overlay without it restarting, but it restarts when using the normal home screen button This is the 'app switcher' of the Android world — here you'll see your most recent tasks and be able to select one to bring it back into the foreground. Okay, that's it. Nothing more to see
Open Camera - A Focus Bracketing (Stacking) App for
Focus Stacker combines sharp areas from multiple images into one seamless composite image. The focus stacking is used in macro photography for subjects like flowers, insects, jewelry, in microscope image processing, in landscape photography. The app has an advanced automatic stacking algorithm and
A Google Play Developer Account (which has a one-time $25 fee) gave me access to the Google Play Console, which let me upload my Android app as a .aab file (Android App Bundle), which makes my code understandable by the Android operating system. I released for every feature that I added and utilized the different forms of testing. Conclusio
Android has the concept of audio focus, and only one app can have focus at a time. The app that has audio focus decides what happens to other apps playing audio — either ducking (lowering.
Photoshop or focus-stacking software like Helicon Focus. Step one: set up your shot. Choose your subject. Whether that's a flower, a small object or anything in between, compose your shot to your.
Full stack developers work on coding, debugging, and developing web applications. From the UI of the web page to the database of the servers, full-stack developers take care of it all. They develop websites that offer attractive designs and work smoothly. Full stack developers primarily work in the field of web development
Android/Mobile Focus Stacking : photograph
• Forest is available for Android mobile and tablet devices, and can be accessed across all Android devices with Pro version. To download the non-Android version of Forest requires a separate purchase. However, by logging into the same account, your data can be synchronized across all platforms Android Stack与Task. 0 HOME_STACK_ID Home应用以及recents app所在的栈 So, we let the task go in the fullscreen task if it is the focus stack. // If the freeform or docked stack has focus, and the activity to be launched is resizeable, // we can also put it in the focused stack Main idea is to create a Router implementation related to every nav_graph you have in your app and take advantage of all the support classes Android Jetpack Navigation provides for you. This AppRouter follows the navigation graph shown in the previous image, with all 4 fragment routers required implementations in it As you navigate through an Android app, different stages of an Activity lifecycle come in action. Basically, Activities in Android are seen and treated like an Activity Stack.. To understand this concept better, picture yourself opening an Activity. In an Activity Stack, this newly-opened Activity would be placed on the top of the stack
jonalmeida added a commit to jonalmeida/focus-android that referenced this issue Aug 13, 2021 Close mozilla-mobile#5120 : Warm GeckoEngine first during app creation Verifie L Camera. L Camera is an open-source experimental camera app for Android L devices using the new android.hardware.camera2 API. Currently, the only supported device is Nexus 5 and Nexus 6 running Android 5.0 Lollipop. Please note that this app is intended to test and study new features of the camera API, it is not for general uses as it lacks many basic camera features (location tagging, white.
We can specify the android:process attribute for an application or any other app component based on the requirement. We can use it with activity, service, broadcast receiver, or content provider. When we specify it for an application it will be running on the specified process, however, when the app is in the background system may destroy the application process to reclaim the resources in. Android development is a software creation process that focuses on applications, better known as apps, that are compatible with devices running the Android operating system (OS). Because Android is an open-source project, developers have easy access to the Android software development kit (SDK) Xamarin+C#. Xamarin is an open-source platform developed by Microsoft for building modern and high-performing mobile applications for iOS, Android, and Windows.. Xamarin is commonly believed to be the best framework for mobile app development and the closest to native. Xamarin uses C# and.Net framework to compile a native code into different mobile binaries, thus making Xamarin apps look like. How to disable auto-focus from EditText in Android Studio Usually we have multiple widgets including one or more EditTexts in an Activity or fragment.Every time user opens these Activities the focus automatically goes to the top most edittext and the virtual key board pops up.This hides rest of the UI, which can be very annoying for the user
FocusStacker on the App Stor
This modified text is an extract of the original Stack Overflow Documentation created by following contributors and released under CC BY-SA 3.0 This website is not affiliated with Stack Overflow SUPPORT & PARTNER Have you ever wondered Whats happening behind the screnes when you tap an app icon and the app launches..??It creates a stack of Activities.The Activities are Arranged in a stack(The back Stack) in the order in which each activity is opened by the User.For example, an email app might have one activity to show a list of new messages Activity Lifecycle in Android with Demo App. In Android, an activity is referred to as one screen in an application. It is very similar to a single window of any desktop application. An Android app consists of one or more screens or activities. Each activity goes through various stages or a lifecycle and is managed by activity stacks
qDslrDashboard - Apps on Google Pla
Android apps are available in the Google Play Store, also known as the Android Market, in the Amazon Appstore, and on various Android App-focused sites. While you can download many Android apps for free, premium apps are also available for purchase by users, with revenues for the latter shared between Google and the software developer
With ProGuard, DexGuard or R8 enabled in your Android app, your stack traces must be deobfuscated. App Center automatically deobfuscates stack traces for your Java, Kotlin, and React Native Android apps when you upload the mapping.txt file created on each build. This file maps the original class, method, and field names to the obfuscated names.
g Languages: You broadly have two options here; Kotlin- the official language used by the android app's developer team or Java, the worldwide popular language used by nearly 40.2% of developers (as per Statista)
10+ Free Focus Stacking Software Download for Windows, MAC
An activity is a single, focused thing that the user can do. When a new activity is started, it is placed on the top of the stack and becomes the running activity -- the previous activity always remains below it in the stack, and will not come to the foreground again until the new activity exits. See android.app.SearchManager for more.
An Android phone running Android 6.0 and up with a data plan. A car or stereo that's compatible with Android Auto. A high-quality USB cable. (For wireless connection) A compatible phone and an aftermarket car stereo from JVC, Kenwood, or Pioneer
7. Master Android App Data Storage Best Practices. Android provides various methods for data storage based on different user needs and applications. For instance, some Android developers use data storage to track user settings or user-provided data.For this use case, the data can be stored persistently in many ways
Skill, This is how I'II build my relationship with you Hey, I'm Bilal, I've been a professional mobile app developer for more than 5+ years with a 100% focus on mobile technologies, I have created many successful apps from scratch for both android and iOS platform, some of the apps that I created, have more than a million downloads, having top.
android - Focus listener in panio app - Stack Overflo
We focus on app usability and experience, creating Android apps that take their users' breath away. See our solutions for entertainment. With over 10 years of experience within the fintech industry, our team offers end-to-end Android app development services in the financial, insurance and banking sectors Tab Stacks and new tab options. Vivaldi 4.1 for Android adds more flexibility to tabs. Now, a new tab can be open as a Tab Stack. The new stack will include the current tab and the newly open tab. Also, the Tab Stack feature has got a few new options. You can disable Tab Stacks and organize tabs manually, make tabs close with a swipe, and more Control your Canon EOS with your Android device! iPad version available here. DSLR Controller was the first and is still the best app to fully control your Canon EOS DSLR from your Android device, with nothing more than a USB cable. No computer or laptop required, no root required. All you need is a compatible mobile device, a compatible camera, and the right USB cable Optimize the Outlook mobile app for your iOS or Android phone Optimize the Outlook mobile app for your phone or tablet. After you set up email in Outlook for Android or Outlook for iOS, you can customize the mobile app to stay connected the way you want.Click on the handy tips below to learn how to optimize Outlook for your mobile device BlueStacks App Player for PC is a desktop emulator software that offers the possibility to play Android games on PC. Although the BlueStacks App player can run any Android app, its features are mainly focused on improving the gaming experience of Android video games in Windows.. About BlueStacks App Player for PC. This app is intended for conversion from one medium to another
Sample Xamarin Forms project structure with iOS, Android, and Core projects. In addition 99% of our code is w r itten and maintained in one place (through .NET Standard or Portable Class Libraries. One popular app is Nova Launcher — though it's worth noting that the paid version app will change the feel and use of your Android phone. If you don't want that, skip to our next suggestion. 1 Brain.fm is a mindfulness app you can download on your iPhone or Android phone. The app uses specially designed music to improve your brain activity, and help you focus and relax. You can turn on. MarketPlace. With the innovation of eCommerce Apps, the online marketplace has become a great source of revenue. Being a proficient Android app development company, we provide the best development services and trending user-friendly UI interfaces that are spontaneous, reliable, and responsive in nature while designing the perfect eCommerce apps at affordable prices
How to do focus stacking with the CamRange
After Active Tab: Opens new tab next to the current active tab (this is the default) As Last Tab: Opens new tab at the end of the tabs. As Tab Stack With Related Tab: Opens a new tab stack with the active tab and the new tab. To find the new setting, go to the V icon > Settings > New Tab Position. Enable or disable Tab Stacks
Run the app. Select the Any CPU configuration and an Android emulator: Press F5 to build and run the project. The Android emulator will start, then Visual Studio will install the app. Finally, the app will start. Enter some text in the Add New Item field, then press enter or click the add item button. The item is added to the list
Share and discover travel photo albums. HindSites is our first product. It is an Android, iOS and Web app focused on creating a worldwide network of travelers and revolutionizing the way these travelers share and discover travel photos. This is Maverick Labs' own product. We took care of everything from design to development
Tools & Technologies. With years of experience, our Android app development services are proficient in implementing any level of complexity within your app. Being a reliable Android app development company, our developers choose the right technology stack that stays in line with your business model
. Gmail (Web, Android, iOS) . Don't be surprised that the best free email app comes default on most Android devices. After all, when Google initially released Gmail in 2004, the tech giant has single-handedly redefined personal email by offering a much larger storage capacity than its competitors and delivering the sleekest email experience the world had seen Set Up New Project. 1.1. Open Android Studio and select - Start a new Android Studio project. 1.2. On the Choose your project panel, select - Phone and Tablet > Empty Activity, and then click Next. 1.3. Click Finish. Follow the on-screen instructions if you need to install any plug-ins
CamRanger - Macro Photography & Automatic Focus Stackin
The best note-taking apps for Android Note-takers, take note: Whether you want gobs of features or uber-simplicity, these are the best apps for collecting and managing info on Android Android is a mobile operating system based on a modified version of the Linux kernel and other open source software, designed primarily for touchscreen mobile devices such as smartphones and tablets.Android is developed by a consortium of developers known as the Open Handset Alliance and commercially sponsored by Google.It was unveiled in November 2007, with the first commercial Android device. 20,000. Moburst is a mobile growth marketing agency founded in 2013 with branches in the US and Tel-Aviv. Moburst's clients include some of the biggest brands in the world such as Google, Uber, Reddit, YouTube, Samsung, and many other amazing startups, gaming companies, and brands
how to focus on listview items in android tv app on
answers Stack Overflow for Teams Where developers technologists share private knowledge with coworkers Jobs Programming related technical career opportunities Talent Recruit tech talent build your employer brand Advertising Reach developers technologists worldwide About the company Log Sign.. Android technology stack. If you're building a mobile app for Android, here's the core app technology to use. Programming Languages. Java - Java is arguably the most popular language for building Android app. Thanks to its usage by major companies, the language is well-supported and has great scalability. You'll have a wide option of.
Managing audio focus Android Developer
29th March 2017. Android Task and Back Stack Review. Android Activities are the logical construct of the screens that we want a user to navigate through. The relation that each Activity holds with respect to other is very crucial for a good user experience. This relation should be designed with the focus of developing an effortless and pattern.
Audio focus is handled as a stack on the system — as such the last process to request audio focus wins. When audio focus has been gained this is the appropriate time to create a MediaPlayer or MediaRecorder instance and allocate resources. Likewise when an app receives AUDIOFOCUS_LOSS it is goo
Android OS provides a back stack function for Activity, it also provides the back stack function for Fragment. If you add one Fragment into the back stack, when you press the android device back menu, you can find the Fragment that is saved in the back stack popup. Until all saved Fragments in the back Android Fragment Back Stack Example Read More �
In the Android L release, Android TV expects device manufacturers to use systems integrators or the Android solutions for regional TV stacks, pass the surface to TV software stacks, or pass the necessary key code to interact with legacy stacks. Here's how the broadcast app and TV App interact: The TV App is in focus, receiving all keys
Stack Exchange is an application aimed to resolve doubts for those users who have mostly technical questions (networks, operating systems, hardware, Wordpress, etc.), and want to find answers to them. Of course the app also works for those who would like to share what they know and help answer those questions
Step Four - Handling Audio Focus. For a good user experience with audio in Android, you need to be careful that your app plays nicely with the system and other apps that also play media
Starting in Android 12, it seems the stock dialer app — which on Pixel phones is the Google Phone app — no longer offers SIP settings. That means you can't add a SIP account or use the stock. BlueStacks app player android emulator download for windows and mac. It is a cloud-based application that connects through online systems. It allows moving file in between Windows and BlueStacks via a shared folder. Ensure to run the sideloading apps on demand. Unlimited apps synchronization, no barrier. Free to all and you won't need to. This example demonstrates how can I know when an EditText loses focus. Step 1 − Create a new project in Android Studio, go to File ⇒ New Project and fill all required details to create a new project. Step 2 − Add the following code to res/layout/activity_main.xml. In the above code, we have taken one edit text and two buttons. remove.
Appslure Provides Full Stack Android App Development in Delhi, India for Meeting your Business or Operational requirements Across the Android Vertical. Being the Best Android app development company in India and best Mobile app Development Company in Delhi, Appslure has often broken its own previously set benchmarks while providing our clients. JUnit is the foundation. First, let's start with the basics: JUnit is the default test framework for Android. Mockito, Robolectric, and Espresso all use it as the backbone and build on top of it. This is one decision you don't have to make. More specifically, AndroidJUnit4 is the current runner that provides utilities to run Android tests In this video, I'll show you the steps to build your first Android application in Visual Studio 2019 with C#, .NET, and Xamarin. We will see how to build a b.. The SDK offers developers with API libraries and developer tools essential to create, test, and debug radiant applications for the Android Platform. This is one of the android frameworks for app developers which is open source and has a user base of 5.9 million developers. Use of Native Android Platfor Tudor is a full-stack software developer focused on JavaScript. He created numerous mobile and web apps, as well as server-side apps. The world of mobile app development is vast and ever-evolving, with new frameworks and technologies popping up almost on a daily basis. When you think about a mobile.
Simple, yet powerful. It's not easy to combine our massive database of SDK intelligence with app store chart rankings, ad intelligence, app permissions and usage, and publisher firmographics, but we did it. You'll benefit from the user interface our customers love and a state-of-the-art architecture that completes over 100,000 scans each week There are two steps to learning how to create an Android app from scratch. You need to learn the language used to code apps. Then you need to learn how to use this information to build an app. Android apps are built using Java or Kotlin. While Kotlin is the official Android language, we're going to focus on learning Java as it is more widely. Thus, installing of SNAPSEED app on your Windows PC is not a direct process but involves a number of extra steps and installation of apps in order to run this app on your Windows system. Thus, it is advised to the users to use the app over your android and iOS devices. Still if there is a need to run and use the SNAPSEED apk file on Windows Step 2: We shortlist Android Developers ideal for you Once we have agreed on the basic wireframe of the app, we handpick the most suited Android Developers from our talent pool, to work on the project. Step 3: As the App is your priority, we will go to extremes to ensure that the developers selected by us, suit your needs
Stay Focused: An App That Brings Focus Stacking to Your
AndroidApp Development. So, if you are a development focused company you might want to extend your team or add skills to your existing team. We do integrate with other team and adds our expertise. We provide full-stack web and mobile app development services from ideation and conceptualizing to deployment and launching..
The advantage of releasing your app for free on the Android platform is that you'll be able to get more downloads. here's how Google stacks up. Less than 20% of Android devices are running on Nougat and Oreo, This will help you focus on the user experience and get more customers on both the iOS and Android platforms
Aress Software offers intuitive Android app development. Android Application is a software stack for mobile devices that consist of an operating system, middleware and key applications. Our Android Application Developers explore the unlimited possibilities of Android through its comprehensive set of development tools
imizing pointer use to null safety and mutability checks, Kotlin is a great language for secure development
Android Studio Welcome Screen. To create your new Android project, follow these steps: In the Welcome to Android Studio window, click Start a new Android Studio project. In the Select a Project Template window, select Empty Activity and click Next. In the Configure your project window, complete the following:Enter User Authentication in the Name field
Record . Android stack traces even when devices are offline or in airplane mode, Sentry makes . Android app development easier by recording environment and state details. Sentry is fundamentally different because we focus on exceptions, or in other words, we capture application crashes. We discuss in more detail here and on our blog Q&A blank in Stack Exchange Android app v1.0.95 - S10e/Android 10 (duplicate) Recently upgraded to a Samsung S10e and Android 10, but all Q&A in the Stack Exchange app v1.0.95 are blank. The title and comments are visible, but question/answer posts are just white space. bug status-declined android-app To build a custom video chat app for android, you have to follow the key points, 1) Hire an in-house team of skillful developers 2) Plan for the UI/UX design that should be minimalistic and intuitive to grab audience attention. 3) Choose the best backend development, the technical stac Develop . IntelliJ Platform Update - Android Studio 4.2 includes all the major features and updates found in IntelliJ IDEA Community Edition 2020.2, which includes an updated GitHub UI for pull requests, and new centralized problems window, and more.Learn more.; Safe Args Support - Using Safe Args is the recommended way to ensure data encapsulation if you want to pass data between two. Web, iOS and Android Interactive Walking App for Sportif AS Fitness solution with gamification elements Working under tight deadlines, Leobit successfully developed iOS and Android walking apps with a web-based admin backend that, among other features, offers a range of exercising-related tasks and achievement tracking
How to bring an activity to foreground i
运行的 Android 版本不同,音频焦点的处理方式也会不同: 从 Android 2.2(API 级别 8)开始,应用通过调用 requestAudioFocus() 和 abandonAudioFocus() 来管理音频焦点� Bottom app bars focus on actions while bottom navigation bars focus on navigation to top-level destinations that need to be accessible from anywhere in the app. And they have two obvious differences: Bottom navigation should be used for 3 to 5 destinations, and bottom app bars should be used for 3 to 6 actions (count FAB) From full-stack development to traditional Android development, we excel in crafting end-to-end applications that are built to cater to your distinct business requirements. We provide next-generation digital products, made by our expert developers, with the most advanced technology and years of experience in the Android app development domain Facebook was an early adopter of OkHttp, a networking stack open-sourced by Square, and it's now the stack used by the Android app. OkHttp allows us to support fast retries for intermittent network situations, take advantage of the SPDY protocol for faster concurrent network transmissions, and enable powerful instrumentation across the.
StackOverflow for Android - APK Downloa
RevenueCat collects, enriches, and stores customer purchases data from every platform so you can integrate it with every tool in your stack. With accurate customer lifecycle events, you can better optimize acquisition campaigns, improve attribution clarity, and empower your team with the reliable data they need. View all integrations Android OS growth is unstoppable, and every year launches a new OS in the market. Android can keep improving its user experience. Android is an open-source language for developing phenomenal programs and has no limitations for add-on features in OS. A quick overview of Android 9 vs. 10 feature, performance and spee
Full Stack Android App development services to transform your ideas into business reality. Let's Talk. Android Software Development Easy to use, Intuitive Android Applications for powerful business impact. At Pulp Strategy, we have the strong expertise of digital marketing blended with engineering services. Pulp Strategy's IT solution. AppState. AppState can tell you if the app is in the foreground or background, and notify you when the state changes.. AppState is frequently used to determine the intent and proper behavior when handling push notifications. App States#. active - The app is running in the foreground; background - The app is running in the background. The user is either Android App Development Panacea is a pacesetter among Android App Development Companies with the delivery experience of more than 1000+ Android apps across diverse market verticals. By using the latest platforms like Java and Kotlin, our developers are delivering best Android apps as per your business needs
Joe Hindy is known as the 'app guy' around these parts. He's been at Android Authority since September of 2012. Previously, Joe was a part of the US Army and attended college for video game design. In spite of the fact that Android will be introducing new features on its Security front in 2021, iOS will win the title of Android vs iOS app security comparison this year too. However, at the crux of the Android vs iOS which platform is the most secure debate lies the fact that the security ultimately depends on the users Build. Get to market and deliver value to your users, faster. Spin up your backend without managing servers. Easily solve common app development problems. Effortlessly scale to support millions of users
Mavis beacon typing tutor free download for mac. Free Download Helicon Focus Pro 7 full version for Windows with this focus stacking software you can make your usual camera render results that could not be achieved even with a classic tilt-shift lens. Take several shots at different focus distances instead of just one, and it will quickly and smartly combine the stack into a fully focused image.
Mounted on the camera as a conventional extension tube, Helicon FB Tube automates focus bracketing in single shot and continuous shooting modes. Adjust settings, hold down the shutter button to shoot a stack and process it in Helicon Focus to achieve a perfectly sharp image.
Nowadays micro photography, close-ups, jewelry and product photography became truly dependent on focus stacking. But it does not matter what you shoot – landscapes or flowers, animals or still-life – It will make your images stand out. Watch the tutorials, read the articles and impress your colleagues and friends with your new photo achievements!
Stacking in Helicon Focus. Helicon Focus is supplied by HeliconSoft. I’ve got the ‘Pro’ version, since I use it for my work and with the stackshot rail. There are demo versions available. There are quite a few software packages that offer stacking – I’ve a short list to explore at the foot of this article.
Zerene Stacker Vs Helicon Focus
You can focus stack with any lens and camera, but you need to have the right post-processing software to combine the photos together. I use Photoshop, since that’s what I already own, but there are better programs out there if you do a lot of focus stacking — Helicon Focus and Zerene Stacker being the two main products. Helicon Focus is a program that creates one perfectly focused image from several partially focused images. The program is designed for optic microscope image processing to cope with the shallow. Focus Stacking is a simple technique. It’s easy to learn and easy to implement. The resulting photos, however, can be striking and unique. Read this review to find out if you need focus stacking software like Helicon Focus.
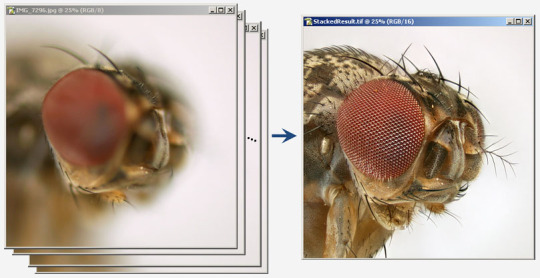
Helicon Focus Discount
Helicon Focus Pro 7 automatically detects the processor type and all available features of modern processors. All the data manipulations are managed with modern processor instructions (SSE, SSE2, AVX, FMA3).
Best Focus Stacking Software 2020
Overview of Helicon Focus Pro 7 Features
Helicon Focus Download
Accurate rendition of colors
Efficient and easy RAW development
State-of-the-art processing algorithms
Advanced interpolation options
Multi-core processing
Stack length is no more a limit
64 bit support
Getting the maximum of your processor
RAW-in-DNG-out mode
Smart retouching
Helping grid
Scientific scale
Split and enqueue stacks
Command line
Smooth integration with Lightroom
Helicon 3d Viewer
Creating a micropanorama
Free Focus Stacking Software For Mac
0 notes
Link
When the world discovered the web, things were unexciting and lifeless. For example, building a simple image mouseover application required several lines of code, and couldn't work on some platforms.
But things got better when jQuery was introduced, since it allowed developers to create stunning JavaScript applications that could run comfortably in various places.
After that, the jQuery team took things a notch higher by developing jQuery UI, which made it possible for developers to create nice-looking web applications on the existing jQuery core.
Better still, in 2010 jQuery Mobile was introduced which has made development much better and more efficient.
Built with a bias to mobile phones, jQuery Mobile is an effective, unified framework that offers UI components, data transitions, and other exciting features.
jQuery Mobile leverages the functionalities of HTML5, CSS3, jQuery, as well as jQuery UI into a single framework that allows developers to achieve consistency across different platforms and devices.
Basic Features of jQuery Mobile
1. Great simplicity and usability
The jQuery Mobile framework is uncomplicated and flexible. Since the framework's configuration interface is mark-up driven, developers can easily build their complete basic application interfaces in HTML, with minimal or no JavaScript code.
Complex tasks requiring several lines of JavaScript code, such as Ajax calls and DOM manipulation, can easily be realized with few lines of code in mobile jQuery.
For example, if we want a user to click and hide some text after a page has been created in the DOM, but before enhancement is complete, we can simply use the pagecreate event handler. This is something that would require several lines code to accomplish without jQuery Mobile.
$(document).on("pagecreate","#mypagetest",function(){ $("span").on("click",function(){ $(this).hide(); }); });
In the above code, the #mypagetest parameter refers to the id of the page that specifies the page event. Also, the on() method is used to attach the event handlers.
Furthermore, its simplicity allows developers to break their applications into multiple pages. With the framework, developers can "write less, and do more."
2. Progressive enhancement and graceful degradation
Progressive enhancement and graceful degradation are key features that propel the agility of jQuery Mobile. They enable it to support both high-end and less capable devices (for example, those lacking JavaScript support).
The framework allows developers to build applications that can be accessed by the widest number of browsers and devices, whether it is Internet Explorer 6 or the newest Android or iPhone.
Mobile jQuery also gives developers the ability to render basic content (as built) on basic devices. And the more sophisticated platforms and browsers will be increasingly enriched using additional, externally linked JavaScript and CSS.
3. Support for user-friendly inputs
During jQuery mobile development, developers can include an uncomplicated API to support touch, mouse, and cursor focus-based user input functionalities. Several types of easily styled and touch-friendly form elements are also included in the framework.
Examples include checkbox and radio sets, slider, search filtering, and menu selection elements. Also, every one of the form elements includes an alternate 'mini' version, which can be easily incorporated into mobile web pages.
For example, here's how to create a checkbox button using jQuery Mobile. Notice that the data-mini="true" attribute is added to create a mini version of the button.
<form> <input type="checkbox" name="checkbox-mini-0" id="my-checkbox" data-mini="true"> <label for="checkbox-mini-0">Click here to agree</label> </form>
Beyond all this, to ensure the user experience is optimized on mobile devices, the framework has a rich Ajax-driven navigation system that allows animated page transitions to take place seamlessly.
With jQuery Mobile transition events, you can animate the transition from the current active page to the new page.
For example, you can use the pagebeforeshow event (triggered on the "to" page) and the pagebeforehide event (triggered on the "from" page) when transitioning from one page to the next. Both events are triggered before the transition animation begins.
Let's see how they can be applied:
$(document).on("pagebeforeshow","#myfirstpage",function(){ // When entering myfirstpage alert("myfirstpage is about to appear"); }); $(document).on("pagebeforehide","#myfirstpage",function(){ // When leaving myfirstpage alert("myfirstpage is about to disappear"); });
4. Accessibility
Besides its cross-platform capabilities, jQuery for mobile was created with a strong consideration for accessibility.
The framework comes with support for Accessible Rich Internet Applications (WAI-ARIA) to assist disabled persons using screen readers and other assistive technologies easily access web pages.
5. Lightweight size
Mobile jQuery's lightweight size (about 40KB when minified) adds to its swiftness. Additionally, the fact that it employs minimal image dependencies also vastly accelerates its capabilities.
6. Theming and UI widgets
jQuery Mobile has an in-built theme system that enables developers to determine their own application styling. With the jQuery Mobile Themeroller, developers can effectively customize their applications to fit their color, tastes, and preferences.
The framework also comes with various innovative, cross-platform widgets that enable developers to create applications that are better customized.
Some of the available widgets are persistent toolbars, buttons, dialogs, and the commonly used popup widget.
7. Responsiveness
The framework's full responsiveness enables the same underlying codebases to fit comfortably in different types of screens, from mobile devices to desktop-sized screens.
Basic Page Structure of jQuery Mobile
jQuery Mobile's structure has all the UI components and attributes required for creating user-friendly and feature-rich mobile web applications and websites of all kinds—whether basic or advanced.
You can use jQuery mobile to build web pages, various types of list views, toolbars, a wide range of form elements and buttons, dialogs, as well as other functionalities.
Importantly, since jQuery Mobile is created on top of jQuery core, it lets developers leverage jQuery UI code and access key facilities. These include robust animation and image effects for web pages, DOM manipulation, event handling, and Ajax for server communication.
Let's get a feel for how jQuery mobile development code looks.
For example, in this time of the COVID-19 pandemic when most people are working from home or from co-working spaces, let's create a simple web page that demonstrates some team management mistakes that people make.
Here is the code:
<!DOCTYPE html> <html> <head> <title>jQuery Mobile Example</title> <meta name="viewport" content="width=device-width, initial-scale=1" /> <link rel="stylesheet" href="http://code.jquery.com/mobile/1.4.5/jquery.mobile-1.4.5.min.css" /> <script src="http://code.jquery.com/jquery-1.11.1.min.js"></script> <script src="http://code.jquery.com/mobile/1.4.5/jquery.mobile-1.4.5.min.js"></script> </head> <body> <div data-role="page" date-theme="c"> <div data-role="header"> <h1>fCC jQuery Mobile Sample</h1> </div> <div data-role="content"> <p>COVID-19 Work-From-Home Team Management Mistakes To Avoid</p> </div> <p> <ul data-role="listview" data-inset="true" data-filter="true"></ul> </p> <p> <ul> <li><a href="#">Using Unnecessary Tools</a></li> <li><a href="#">Foregoing Team Evaluations</a></li> <li><a href="#">Micromanaging</a></li> <li><a href="#">Hiring Too Quickly</a></li> <li><a href="#">Not Having Contingencies</a></li> </ul> </p> <div data-role="footer"> <h4>alfrickopidi.com, 2020 - Copyright</h4> </div> </div> </body> </html>
Here is the output when the above mobile jQuery lines of code are opened on a browser:

Notably, when the browser is decreased or increased, the size of the items in the list also adjusts appropriately. Therefore, the web page can be easily accessed in various devices with different screen resolutions without worrying about lack of consistency. The size of the items will change accordingly to suit the type of device.
As you can see in the above code sample, the document is a simple HTML5 that includes the following three things:
Files from the jQuery Mobile CSS (jquery.mobile-1.4.5.min.css)
Files from the jQuery repository (jquery-1.11.1.min.js)
Files from the jQuery Mobile repository (jquery.mobile-1.4.5.min.js)
These files are directly linked to the jQuery CDN. Another alternative is to head over to the download page to get these files and host them on a private server.
Importantly, including the "viewport" metatag during jQuery mobile development instructs devices that the page width and the device screen width are equivalent (width=device-width).
The tag also instructs the browser to zoom in to 100 per cent (scale=1). If the scale is changed to 2, for instance, the browser will zoom the web page by 50 per cent.
A closer examination of the code reveals some strange "data-"attributes scattered throughout it. This is an improved feature of HTML5 that enables developers to pass organized data across an application – for example, the data-role="header" attribute defines the head section of the web page.
The above example just scratches the surface of the things developers can achieve using jQuery Mobile. The framework's documentation is easy to follow and describes its many features, including linking pages, incorporating animated page transitions, and designing buttons.
Conclusion
jQuery for mobile is a resource-rich framework built with jQuery, HTML5, and CSS capabilities to handle certain cross-platform, cross-device and cross-browser compatibility issues effectively.
The framework offers great opportunities for creating mobile and web applications that are powerful, fully responsive, and future-ready.
Will you give it a try?
0 notes
Text
kotlin android 개발 날씨앱 만들기 과정 요약
original source : https://www.youtube.com/playlist?list=PLEPZdzLLJH94Jk_Jz-cTUXYFoObPBH7KB
시애틀에 있는 수염난 안경낀 백인 청년 설명
.

.

.
.
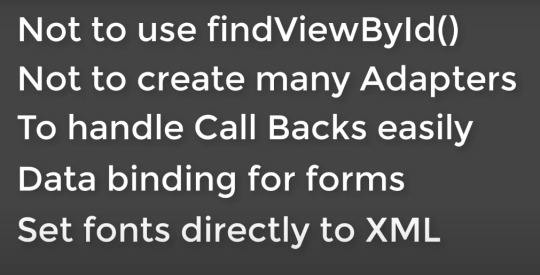
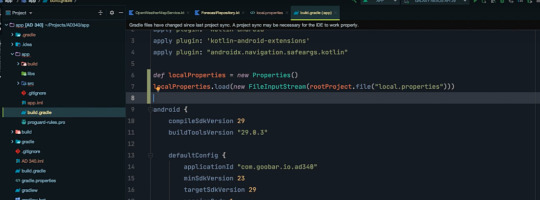
data binding을 위해서 gradle에서 해야할 작업
.
data binding의 장점
.

.
.
3rd party image loading library들 이 강의에서는 coil을 사용

.
toolbar를 app bar로 사용하면서 navigation component를 사용하는 경우

.
tool bar를 app bar로 사용하는 경우 약간의 material 느낌을 주기위해 AppBarLayout를 이용한 경우

.
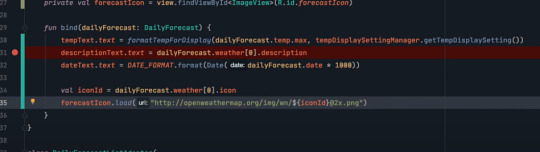
coil를 사용해 image loading한경우
.
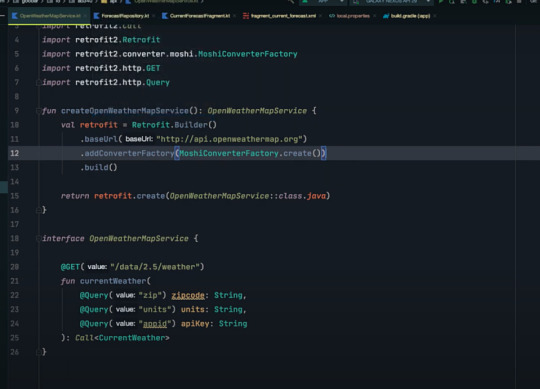
json converting을 위해 moshi를 사용한 경우
.
retrofit

.
.
.
민감한 data를 외부에 놓고 사용하는 방법
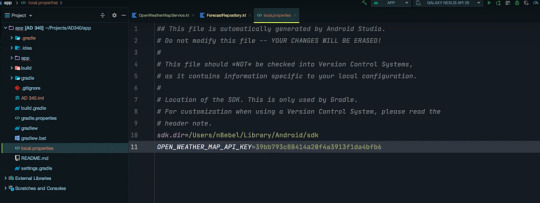

.
.
.
외부에서 전달되는 json data의 키와는 다른 field명을 쓰고 싶을때
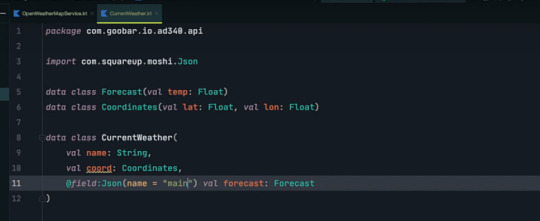
.
외부와 data 통신시에 보안을 위해 usesCleartextTraffic을 사용한다.

.
.
.
.
1강
0:01 - Week 0 Review
1:22 - Syllabus Review
2:40 - Class Announcements
6:14 - Why Learn App Development?
9:26 - Challenges of App Development
15:34 - Types of Mobile Development
22:36 - Why Android Development?
27:42 - Setting Up Our Android Development Environment
28:34 - Installing Android Studio
36:12 - Creating Your First Android Studio Project
39:17 - Creating An Android Emulator
41:52 - Installing Your First Android App
45:14 - Sharing An Android Studio Project to GitHub
50:06 - Building An Android APK
- What are the unique benefits and challenges of Android app development?
- What are some different ways of building mobile apps?
- What makes Android the most popular mobile operating system?
- What is Android Studio?
- What is the Android Emulator?
- What is Kotlin?
- How do you create a new Android project?
- How do you share code from Android Studio to GitHub?
- How do you add a README to your GitHub repo?
.
.
.
.
2강
0:36 - Outline
1:57 - Android Framework Components
14:07 - What is generated when you create a new Android Studio project?
40:26 - Working with Android Activities
41:20 - Android Activity lifecycle
50:12 - Using the Android Studio debugger // How to set a breakpoint in Android Studio?
59:38 - Creating Interactive User Interfaces
1:01:46 - What is FrameLayout?
1:05:09 - What is LinearLayout?
1:08:34 - What is RelativeLayout?
1:14:22 - What is ConstraintLayout?
1:28:09 - Responding To User Interaction
1:29:00 - ConstraintLayout simple tutorial
1:29:37 - How to create a new Vector Asset in Android Studio?
1:38:46 - How to respond to a Button click in Android
1:40:04 - Android Button setOnClickHandler
1:45:40 - Receiving user input using an EditText
1:54:00 - Customize Material Design theme in Android Studio
- What are the Android app components?
- What is an Android Activity?
- What is generated when we create a new Android Studio project?
- What is the Android Activity lifecycle?
- What is the difference between an Android ViewGroup and a View?
- What is a FrameLayout? LinearLayout? Relative Layout? ConstraintLayout?
- How to build a simple UI using ConstraintLayout?
- How do define an Android click listener?
- How to show a Toast message in an Android Activity?
- How to enable Android developer options?
- How to use an EditText to receive user input?
.
.
.
.
3강
- How to display dynamic content in an app?
- How to display large collections of data?
- How to architect your app to provide data to your Activity?
- What is MVVM?
- What is LiveData?
- How to model data with Kotlin data classes?
- How to create a RecyclerView Adapter?
- How to bind data using a RecyclerView ViewHolder?
- How to define an onClickHandler for your RecyclerView?
- How to format String resources?
.
0:25 - Outline
2:17 - Project Demo
3:56 - Displaying Dynamic Data
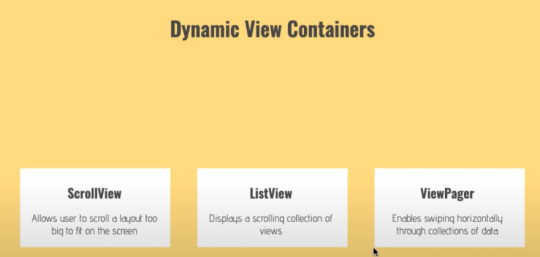
5:05 - Dynamic view containers // ScrollView, ListView, ViewPager
6:57 - RecyclerView
7:50 - Why RecyclerView?
16:47 - Defining A Data Model
20:00 - Modeling data with Kotlin data classes
24:25 - What is LiveData?
28:08 - Implementing A RecyclerView
29:23 - Creating a data class to model daily weather forecasts
31:50 - Creating a data repository
32:04 - Using LiveData to expose data from a repository
49:54 - Adding a RecyclerView to your layout xml file
52:37 - How to use Logcat to understand why your app crashed
54:58 - Add RecyclerView dependency to your build.gradle file
57:52 - How to add margin to your RecyclerView using ConstraintLayout design view?
1:01:57 - How to implement a RecyclerView Adapter using Kotlin?
1:30:38 - Add touch feedback to RecyclerView list items
1:40:00 - How to format String resources?
.
.
.
.
4강
- How to create a new Android Activity?
- How to use an Intent to open a new Activity when a button is clicked?
- How to display an options Menu
- How to respond to a Menu item click?
- How to display an AlertDialog?
- How to save a value using SharedPreferences?
.
.
.
.
5강
- How to create a new Fragment
- How to migrate UI/logic from an Activity to a Fragment
- How to communicate between a Fragment and an Activity
- How to add a FloatingActionButton to your UI
.
.
.
.
6강
- What is the Android Navigation Architecture Component?
- What problems is it trying to solve?
- How to create a navigation graph?
- How to add new destinations and actions to your navigation graph?
- How to navigate to a new Fragment using the NavController?
- How to update your AppBar based on navigation changes?
- How to implement a BottomNavigationView?
.
.
.
.
7강
- How to load data from a remote api using Retrofit; an HTTP client library for Android/JVM?
- How to listen to changes in SharedPreferences values?
- How to load and display remote images using the Coil image loading library
.
.
.
.
0 notes
Video
In this video we are going to implement a custom ListView for our Electronic Shop android app. Our custom ListView contains an ImageView for displaying product image, two TextView for product name and product price, Two ImageButton for increment and decrements the quantity of the product to purchase and finally an EditText to display product quantity selected by end user.
For Complete Source Code and Code to copy please visit below blog Post.
Blog Post: https://vlemonn.com/Blog/Android/Android-Custom-ListView-with-ImageView-EditText-and-Button
If you want to download complete project download button is the bottom of the article.
Key Points 1. ListView 2. Adapter 3. getView function 4. What is convertView 4. Click listener
Note: If source code is not updated please let us know.
Support Us: PayPal: https://www.paypal.me/vlemonn Patreon: https://www.patreon.com/vlemonn
Useful URL: Our Website: https://vlemonn.com Blog Post: https://vlemonn.com/Blog/Android/Android-Custom-ListView-with-ImageView-EditText-and-Button Facebook: https://www.facebook.com/vLemonn Twitter: https://www.facebook.com/vLemonn Google Plus: https://plus.google.com/112993831877465971811
#Android#Android Tutorial#ListView#Click Listener#Custom ListView#Android Free Tutorial#Free Tutorial#Tutorial#free#vlemonn#Mayank Sanghvi
1 note
·
View note
Text
300+ TOP XAMARIN Interview Questions and Answers
XAMARIN Interview Questions for Freshers and experienced :-
1. What is Xamarin? Xamarin is a developing technology which is used to build UI for Android, iOS, and Windows operating systems using only CQ. 2. What are the extensions of Xamarin applications? For Android applications, the extension is .apk and for iOS, it is .app. 3. On what platforms you can work? Android and iOS are the two most popular operating systems on which I can work. 4. What are the languages that Xamarin support for developing any application? Xamarin is a cross-platform technology which supports FQ and CQ for application development. 5. In an application where you need to require the calculation of shortest distance, then which algorithm will be used? In that case, the best algorithm to use is the depth first search algorithm. 6. What are the different ways to make Xamarin apps? Mainly, there are two ways to get the job done. The first is the Xamarin.forms, and the other one is the traditional Xamarin approach. 7. How to decide which way to use to Xamarin apps? For all those applications where you either code sharing is the priority rather than unique UI or that need very less custom functionality, then Xamarin.froms can be used. On the other hand, you can use Xamarin native for all those apps where custom UI is the priority or you have to make custom interactions. 8. Do you know about application package modes? There are two modes to choose from. The first one is the release mode and the other one is debug. Both of them have their own requirements and are used when necessary. 9. Mention the different Xamarin.forms techniques to share codes. Shared projects and PCL are ways to share codes. 10. Elaborate on the use of page in Xamarin.forms. The page is an element which covers almost the entire screen and only has one child. For Android, Windows, and iOS, it is an activity, page, and view controller respectively.

XAMARIN Interview Questions 11. Tell us about Xamarin.forms pages. There are several pages in Xamarin.forms and they are used as per their requirements. Some of them are tabbedpage, contentpage, and carouselpage. 12. Explain views. Views are just another word for widgets. Some of the views are an image, list view, button and label. 13. Can you differentiate between TableView and ListView? The major difference between the both is that TableView shows data in a horizontal manner whereas ListView shows data in a vertical manner. 14. Why cells are used in Xamarin.forms? Cells are parts that are specifically created to be attached to TableView or ListView. 15. How editor is different from entry? The primary motive of both of these features is to assist the user in entering text. However, the major difference is that the editor has several lines and entry has only a single line. 16. Explain data binding. It is a method where a user interface synchronizes automatically with the data source. It shows all the updates automatically to the user interface. Mainly, it focuses on target as well as the sources. 17. Are you aware of the techniques used in data binding. Yes, there are four different techniques for data binding. Twoway, oneway, default, and onewaytosource. 18. What do you know about TestFlight? TeshFlight is a method by which you can best test your applications designed for iOS. 19. Why Hockeyapp is used? Hockeyapp is a service which is used to test iOS, windows and android apps. 20. Do you know about NuGet? Yes, NuGet is a package manager of .NET development. It is not just any other manager, but the most widely used one. 21. What are Activities? Activities offer a platform for the user interface which is graphical and only has one screen. 22. What are Native Apps? Native apps are those which require specific language for their development. This language can be Java, CQ, or swift. 23. What are Cross-Platform apps? Cross-platform apps are those which are developed for all the three mobile platforms with a single code base. However, they need personalization in the user interface as per the operating system. 24. What are the reasons to use XAML? XAML is a language used by developers which helps them in specifying the UI with the help of markup instead of any code. 25. What are the reasons to avoid XAML? Even though XAML is a great technique, but still it has some disadvantages. The reason why it should be avoided is that it does not has any code. Moreover, you cannot define loops of conditional processing. 26. Define Grid Grid is a layout control in Xamarin.forms which displays information in columns and rows. 27. What is ContentPresenter? ContentPresenter is used to view templates. It helps in managing how the content appears. 28. What is padding property? Padding is always added from the internal part of the element and directly affects the content away from the edges. 29. What is margin property? Margin is the opposite of padding which is executed from the outside of the element and affects how distant the content is from other contents. 30. Mention situations where you can use data binding. Data mining has different scenarios where it can be used. Model binding, collection binding, and backward binding are some of the scenarios. 31. Xamarin history? Xamarin is a Microsoft-owned San Francisco, California based software company founded in May 2011 by the engineers that created Mono, Mono for Android and MonoTouch . Novell had granted a perpetual license for Mono on july 2011 for MONO On May 16, 2011: Miguel de Icaza announced on his blog that Mono would be developed and supported by Xamarin, December 2012, Xamarin released Xamarin.Mac which allows developers to build C#-based applications for the Apple OS X operating system and package them for publishing via the Apple App Store. Xamarin 2.0 was released in February 2013 Xamarin.Android and Xamarin.iOS that make it possible to do native Android, iOS and Windows development in C#, with either Visual Studio or Xamarin Studio. Xamarin.forms: Introduced in Xamarin 3 on May 28, 2014 and allows one to use portable controls subsets that are mapped to native controls of Android, iOS and Windows Phone. On February 24, 2016: Microsoft announced it signed a definitive agreement to acquire Xamarin On March 30, 2016: Microsoft acquired the xamarin. And made it for all with free of cost. 32. What are disadvantage of Xaml in Xamarin.Forms? XAML cannot contain code. All event handlers must be defined in a code file. XAML cannot contain loops for repetitive processing. (However,ListView —can generate multiple children based on the objects in its ItemsSource collection.) XAML cannot contain conditional processing (However, a data-binding can reference a code-based binding converter that effectively allows some conditional processing.) XAML generally cannot instantiate classes that do not define a parameterless constructor. (However there is sometimes a way around this restriction.) XAML generally cannot call methods. (Again, this restriction can sometimes be overcome.) 33. When to use Xamarin.Forms vs Xamarin Native? Xamarin.Forms: Apps that require little platform-specific functionality. Apps where code sharing is more important than custom UI. Xamarin.IOS,Xamarin.Android: Apps that require specialized interactions. Apps with highly polished design. Apps that use many platform-specific APIs. Apps where custom UI is more important than code sharing. 34. What is is the difference between ListView & TableView? The ListView and TableView controls are so similar, you can think of them as a single control. The major difference between the two is the manner in which they lay out their items, and it’s easy to change the layout so each control emulates the other. The ListView control displays its data stacked vertically, much like a standard listbox. Use this control to display an ordered list of data, especially long lists that require scrolling like a list of email messages, a list of contacts, or search results. The TableView control displays its data stacked horizontally in rows (although you can alter this behavior and have it displayed in columns first, as well). You use this control when you need more space for rich visualization of each item to be displayed. One of the big differences is ListView provides you a ItemsSource and a Itemtemplate and TableView does not. So items must be added as children manually. 35. What are the layout controls available in Xamarin.Forms? Layout is the process of sizing and positioning child elements in UI. ContentPresenter: A layout manager for templated views. Used within a ControlTemplate to mark where the content to be presented appears. ContentView: An element with a single content. ContentView has very little use of its own. Its purpose is to serve as a base class for user-defined compound views. Frame: An element containing a single child, with some framing options. Frame have a default Xamarin.Forms.Layout.Padding of 20. ScrollView: An element capable of scrolling if it's Content requires. TemplatedView: An element that displays content with a control template, and the base class for ContentView. AbsoluteLayout: Positions child elements at absolute requested positions. User assigned anchors and bounds defines the position and size of the control. Grid: A layout containing views arranged in rows and columns. RelativeLayout: A Layout that uses Constraints to layout its children. StackLayout: A Layout that positions child elements in a single line which can be oriented vertically or horizontally. This layout will set the child bounds automatically during a layout cycle. User assigned bounds will be overwritten and thus should not be set on a child element by the user. XAMARIN Questions and Answers Pdf Download Read the full article
0 notes
Text
Material Design UI Android Template App

Material Design UI Android Template App
This delightful Android UI Design with thought to give engineers a simple and viable approach to make their applications additionally lovely. With this Android UI Design layout, you don't have to free your valuable time to set up pre-structured realistic – it did for you from the beginning of this android UI kit! All components are enlivened with Android Material Design Template and made by their directions. Additionally, all components are accessible to be utilized in more seasoned variants of Android so you don't need a costly cell phone to have a great Material plan. You can without much of a stretch execute parts from Android UI kit just by following our gigantic and efficient documentation. Your's is simply to code, this app design template will do the structure. Simple as cake. Glad coding!

Full component list Tabs – Five subjects of tabs, and five new sections prepared to utilize. Open Source ventures utilized in these components: Universal Image Loader, Pager Sliding Tab Strip. Wizards – Five topics of wizards and five new parts prepared to utilize. Open Source ventures utilized in these components: Universal Image Loader. Custom Dialogs – Six subjects of custom exchanges, prepared to utilize. Open Source ventures utilized in these components: Universal Image Loader. ListViews – Six renditions of ListViews, as Expandable rundown, Drag&Drop, Swipe-to-expel, Appearance movement, Sticky rundown headers, Google Cards. All prepared for use in a delightful Material plan style. Open Source ventures utilized in this component: Universal Image Loader, Ken Burns View, Material Ripple Layout, ListView Animations, Sticky List Headers, Animated Expandable ListView. Parallax Effect – Parallax picture impact joined with rundown see with Ken Burns impact. Open Source ventures utilized in this component: Universal Image Loader, Ken Burns View, Material Ripple Layout, Pull Zoom View, Not Boring ActionBar. Left Menu – Two adaptations of the left menu with Material structure, prepared to utilize. Open Source ventures utilized: Universal Image Loader, Material Ripple Layout. Login Page – Login page in dull and light forms, with vivified letters, prepared to utilize. Open Source ventures utilized: Float Labeled Text Field, Material Ripple Layout. Picture Gallery – Two kinds of GridViews with pictures for display, with fresh out of the plastic new plan and delightful selector. Open Source ventures utilized: Universal Image Loader, Material Ripple Layout. Shape Image Views – Eight present-day states of picture sees for your symbols, profile pictures, etc. Open Source ventures utilized: Universal Image Loader, Shape Image View. Advancement Bars – 14 sorts of round and catch advance bars and loaders arranged for your application. Open Source ventures utilized: Progress Wheel, Circular Progress Button. . Check Buttons – Dark and light forms of checkboxes enlivened by Material structure. Open Source ventures utilized: Material Ripple Layout. Sprinkle Screen – Three forms of lovely planned and enlivened sprinkle screen. Open Source ventures utilized: Universal Image Loader, Ken Burns View. Content perspectives – Prepared typography by Google guidelines for TextView. Hunt bars – Dark and light pursuit bar with inquiry recommendations arranged to put in your application. Open Source ventures utilized: Material Ripple Layout. Symbols – a wide scope of free Fontello symbols. Symbols are included by means of Fontello – not any more four distinctive measured PNGs. In our task is 46 symbol in .svg design. Bound together realistic – every single realistic component is motivated by Android Lollipop Material Design. All components arranged in one shading style to finish your application. Simple hues changing – hues are variable in one XML and essential shading for all designs and components are alterable in one line. Completed components and formats prepared to utilize – prepared XML documents and drawables for use in your application. Numerous components have activity as well as straightforwardness – wonderful straightforward movements which are increasingly prominent. All components and designs take a shot at old variants of Android (from 4.4 rendition) as well – each component has its very own AndroidMainfest.xml document with characterized minSDK. Characterize typefaces and textual styles through XMLs – no more need to make text styles from resources organizer.

Read the full article
#Android5.0#Android5.1.x#Android6.0#androiddesigntemplatesxmlfreedownload#androidtemplate#androiduidesign#androiduidesigntool#androiduikit#androiduitemplatessourcecode#appdesigntemplate#appuitemplates#clean#expandable#freeandroidxmllayoutstemplate#googlecards#layout#materialdesign#materialdesigntemplate#materialdesignuiandroidtemplateapp#materialdesignuiandroidtemplateappcodecanyon#materialdesignuiandroidtemplateappfree#materialdesignuiandroidtemplateappinandroidstudio#materialdesignuiandroidtemplateappsourcecode#materialdesignuiandroidtemplateappsourcecodefree#materialdesignuiandroidtemplateappv2.1#materialuitemplate#nexus#parallax#swipetodismiss#tab
0 notes
Photo

New Post has been published on https://fitnesstech.website/product/letscom-fitness-tracker-with-heart-rate-monitor-watch-activity-tracker/
LETSCOM Fitness Tracker with Heart Rate Monitor Watch, Activity Tracker
HomeNew ArrivalsEnding SoonAbout UsShippingReturnsPaymentContactFAST SHIPPINGOn All Items30 DAYS MONEYBACKHassle Free ReturnsCUSTOMER SUPPORTExcellent Service100% SATISFACTIONSatisfaction Guarenteed LETSCOM Fitness Tracker with Heart Rate Monitor Watch, Activity Tracker with Step Counter, Pedometer, Calorie Counter Watch for Android and iOS Smart PhoneDESCRIPTIONUse this Letscom fitness tracker with our well-designed app VeryFitPro, which is compatible with iOS 7.1/Android 4.4 or later smartphones. BT 4.0 or later are also required. Feature Description: Call Notification: The tracker vibrates and caller ID is displayed on screen when there is an incoming call. You can hang up calls using only the tracker. SNS Notification: Receive notifications from other apps (Facebook, WhatsApp, LinkedIn, Instagram, and Twitter) on your tracker screen. Photo Shooting: Operation on the screen could remotely control photography shooting. Waterproof Rating: IP67 life-level waterproof, sweat-proof, rain-proof. Not for showering, swimming or diving. Wrist Sense: Tracker screen is lighted up when you turn your wrist towards you. SPECIFICATIONS: Model: ID130 HRCPU: Nordic nRF52832-QFAASensor: KIONIX KX022-1020HR Sensor: silicon labs Si1142Screen: 0.96 inch OLEDMaterial: upper casing: PC; strap: TPE Dimension: suits for wrist size: 5.4 inch – 7.6 inch Battery type: Li BatteryBattery capacity: 65mAh Working time: 5-10 daysCharging method: USB chargingCharging time: 1-2 hoursWeight: 0.8oz (22.6g)ABOUT US We offer the best prices around on high quality products. Our E-store includes media such as books, movies, music and games while offering electronics, toys, sporting apparel, clothing, tools, general home, garden items and more.CUSTOMER SATISFACTION We try over very best to make sure every customer is completely satisfied. If there’s a problem, message us! We’re happy to help.SHIPPING TERMS We are always working hard to ensure your package arrives as soon as possible. Please understand that some factors like weather, high postal traffic, and the performance of shipping companies are outside of our control. Read MoreRETURNS POLICY We offer a 30-Day Return Policy on items in which you are not completely satisfied with. You have the option of a full-refund or an exchange of the item. No returns are available on items shipped outside of the USAELECTRONICS All electronics we sell are designed to run on 110-120V unless stated otherwise. These were manufactured to be used in the USA. Use outside of the USA at your own risk.TAXES We have distribution centers that charge taxes on sales in the following states: AL, AZ, CA, CO, CT, FL, GA, IL, IN, IA, KS, KY, LA, MA, MD, MI, MN, MO, MS, NC, ND, NE, NJ, NV, NY, OH, PA, SC, SD, TN, TX, UT, VA, VT, WA, WI, AND WY.ADDITIONAL INFO Packaging may not be the same as shown in the image. Manufacturers sometimes update their packaging without notifying us. We do our best to update the images in a timely manner. SUBSCRIBE TO OUR NEWSLETTERJOIN NOWSTORE PAGESHomeAbout UsPaymentShippingReturnsUSEFUL LINKSView ShopAdd to favorite SellerJoin our Mailing ListView FeedbackContact SellerWE ACCEPTCONTACT USOur dedicated staff is happy to help. Less than 24 hour response time. Copyright © 2017 busybear. | All Rights Reserved
Brand: LETSCOM
MPN: Letscom
ISBN: Does not apply
UPC: 643824555068
0 notes
Text
How Mirror works: first look at developing for Mirror
We're getting closer to ship the first dev kits of Mirror, the world's first video beacon, and we want to take this opportunity to start introducing you to the Mirror technology.
In this post, we'll give you a sneak-peek of how Mirror works and the philosophy behind some of that. Most importantly though, you'll learn what all of this means for building first Mirror-powered experiences!
Some of the things we mention in this post are still work in progress and might change—but it should still give you a general idea of where it's all headed!
Sourcing the context for the smart screen
Our mission for Estimote Mirror is to turn screens into smart "assistants", showing personalized content based on who's nearby, where they are, what objects they're interacting with, etc. To make this possible, something needs to feed Mirror with that data.
This is why, much like with regular beacons, the smartphone and the mobile app are still at the heart of it all.
Your airline app knows where you're flying to. Your shopping list app knows what products you're looking for. Your running app knows whether you're a marathoner or sprinter.
This makes it possible to
highlight your flight info at the airport screen, direct you to the right aisle from the supermarket's screen, or suggest the right shoes for you right there at a screen in a sportswear store.
You don't have to pull the smartphone out of your pocket, but it's still silently doing the job of making sure you're shown just the right information.
This is why, when your Mirror dev kit arrives, it'll be coming with iOS and Android SDKs.
Side note: we also have other sources of context in mind for Mirror. If you've seen our Mirror video, you know that it can also interact with Estimote Stickers. We're REALLY excited about this, and we'll be covering that in a separate post in the future.
Mobile Mirror SDK, your "remote" for Mirror
The mobile SDKs for Mirror are about more than just feeding Mirror with user data. In fact, they're in full control of what to show on Mirror:
When the user comes near the screen, the mobile Mirror SDK will establish a Bluetooth link between the smartphone and the Mirror, and tell it to display the view however you programmed it (uploading the assets if necessary).
There's no need to upload any "Mirror apps" to the Mirror itself—your mobile app is the ultimate remote for Mirror.
A sneak-peek at one of our Mirror demos!
This makes it easy to get started: just drop some code into your mobile app, the way you always do—Swift, Java, Obj-C, Kotlin, your call. Iterating? Submit a new version of your app to the app store. The next time the user comes in range of Mirror, they'll immediately see the updated experience. You could have a thousand Mirrors deployed in locations with no WiFi, and yes, all it takes is distributing an updated version of your mobile app—a problem already solved by iOS and Android.
Built-in views, custom views
At the heart of developing for Mirror are the Mirror views (e.g., the TextView shown above), so let's also talk about that for a moment.
Mirror uses a subset of HTML5 and CSS3 to render its UI, and the Mirror views are ready-made pieces of HTML that are stored on the Mirror's flash drive. The mobile SDK can then invoke any of these views when in range of Mirror, filling the blanks in.
Much like iOS or Android's collection of built-in components (UITableView, ListView, etc.), we'll be baking our own collection into the Mirror OS itself: text view, table view, image view, etc. We're spending a lot of time fine-tuning them to work great on the big screen, so that you don't have to. However, we are also making sure these views are extremely customizable. Colors, backgrounds, fonts, image on the left or on the right, these things are up to you.
Finally, you can always build and upload your own, hand-crafted, custom views to Mirror. Write some HTML/CSS/JS, test in a regular web browser, add a few placeholders to be filled in later by the mobile app, deploy to Mirror. Front-end web developers should feel at home!
Thoughts?
We hope you enjoyed this preview into what developing for Mirror looks like—we certainly are excited to be sharing it with you. Let us know what you think on our forums, or by dropping us a note to [email protected]. We're eager to hear your feedback!
Piotr Krawiec, Head of Developer Experience at Estimote
5 notes
·
View notes
Text
New Post has been published on Simplified Coding
New Post has been published on https://www.simplifiedcoding.net/android-sync-sqlite-database-with-server/
Android Sync SQLite Database with Server using PHP and MySQL
Lets learn Android Sync SQLite Database with Server. Assume we have to send some information from the application to our webserver and internet is not available on the device at a particular time. So instead of giving error to the user that internet is not available we can store the data to SQLite and send it later automatically when the internet is available. And this is what we are going to learn in this Android Sync SQLite Database with Server Tutorial.
Contents
1 Android Sync Sqlite Database with Server Demo
2 Creating Web Service and MySQL Database
2.1 Creating Database
2.2 Creating Web Service
2.2.1 Creating Script
2.2.2 Testing Script
3 Android Sync SQLite Database with Server
3.1 Creating Android Project
3.2 Adding Permissions
3.3 Adding Dependencies
3.4 Handling SQLite Operations
3.5 Handling Volley RequestQueue
3.6 Building Interface
3.6.1 MainActivity
3.6.2 ListView
3.7 Building ListView
3.7.1 Model Class
3.7.2 Adapter
3.8 Coding MainActivity
3.9 Detecting Network State
3.9.1 Creating Broadcast Receiver
3.9.2 Adding Receiver in Manifest
3.9.3 Registering Receiver
4 Testing the Application
5 Download Source Code
Android Sync Sqlite Database with Server Demo
You can first see what we are going to learn in this video where I am showing the application.
youtube
Now lets move ahead and start Android Sync Sqlite Database with Server.
Creating Web Service and MySQL Database
Creating Database
I have the following database. I am using XAMPP you can use anything you want.

So we have the database table. Now we will create a php script that will handle the insertion to the database.
Creating Web Service
Creating Script
Create folder in your root directory (in my case it is htdocs).
Now create a php file inside the folder, I have created saveName.php. And write the following code.
<?php /* * Database Constants * Make sure you are putting the values according to your database here */ define('DB_HOST','localhost'); define('DB_USERNAME','root'); define('DB_PASSWORD',''); define('DB_NAME', 'android'); //Connecting to the database $conn = new mysqli(DB_HOST, DB_USERNAME, DB_PASSWORD, DB_NAME); //checking the successful connection if($conn->connect_error) die("Connection failed: " . $conn->connect_error); //making an array to store the response $response = array(); //if there is a post request move ahead if($_SERVER['REQUEST_METHOD']=='POST') //getting the name from request $name = $_POST['name']; //creating a statement to insert to database $stmt = $conn->prepare("INSERT INTO names (name) VALUES (?)"); //binding the parameter to statement $stmt->bind_param("s", $name); //if data inserts successfully if($stmt->execute()) //making success response $response['error'] = false; $response['message'] = 'Name saved successfully'; else //if not making failure response $response['error'] = true; $response['message'] = 'Please try later'; else $response['error'] = true; $response['message'] = "Invalid request"; //displaying the data in json format echo json_encode($response);
Testing Script
Now its time to test the script we created. So in my case the URL is http://localhost/SqliteSync/saveName.php
I am using POSTMAN to test the script and you can see it in below screenshot.
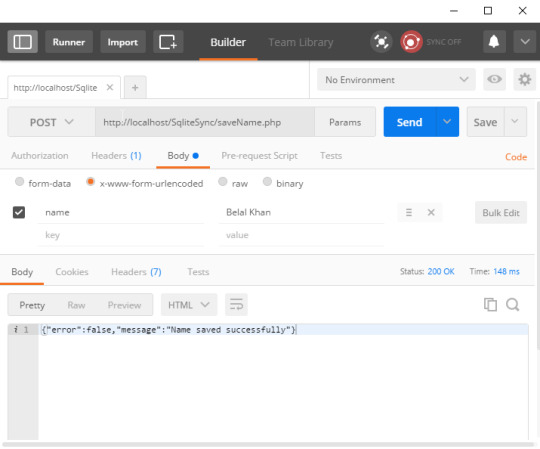
As you can see the script is working fine. Now lets move ahead in android project.
Android Sync SQLite Database with Server
Creating Android Project
Create a new project.
I have created AndroidMySQLSync with an Empty Activity.
Adding Permissions
We need the following permissions so first add these to AndroidManifest.xml.
<uses-permission android:name="android.permission.INTERNET" /> <uses-permission android:name="android.permission.ACCESS_NETWORK_STATE" />
Adding Dependencies
For network requests I am going to use Volley. So add the following line inside dependencies block of your app level build.gradle file.
dependencies compile fileTree(dir: 'libs', include: ['*.jar']) androidTestCompile('com.android.support.test.espresso:espresso-core:2.2.2', exclude group: 'com.android.support', module: 'support-annotations' ) compile 'com.android.support:appcompat-v7:25.0.1' //add this line compile 'com.android.volley:volley:1.0.0' testCompile 'junit:junit:4.12'
Handling SQLite Operations
In this case we have to use both SQLite and MySQL. So a class named DatabaseHelper.java and write the following code.
package net.simplifiedcoding.androidmysqlsync; import android.content.ContentValues; import android.content.Context; import android.database.Cursor; import android.database.sqlite.SQLiteDatabase; import android.database.sqlite.SQLiteOpenHelper; /** * Created by Belal on 1/27/2017. */ public class DatabaseHelper extends SQLiteOpenHelper //Constants for Database name, table name, and column names public static final String DB_NAME = "NamesDB"; public static final String TABLE_NAME = "names"; public static final String COLUMN_ID = "id"; public static final String COLUMN_NAME = "name"; public static final String COLUMN_STATUS = "status"; //database version private static final int DB_VERSION = 1; //Constructor public DatabaseHelper(Context context) super(context, DB_NAME, null, DB_VERSION); //creating the database @Override public void onCreate(SQLiteDatabase db) String sql = "CREATE TABLE " + TABLE_NAME + "(" + COLUMN_ID + " INTEGER PRIMARY KEY AUTOINCREMENT, " + COLUMN_NAME + " VARCHAR, " + COLUMN_STATUS + " TINYINT);"; db.execSQL(sql); //upgrading the database @Override public void onUpgrade(SQLiteDatabase db, int oldVersion, int newVersion) String sql = "DROP TABLE IF EXISTS Persons"; db.execSQL(sql); onCreate(db); /* * This method is taking two arguments * first one is the name that is to be saved * second one is the status * 0 means the name is synced with the server * 1 means the name is not synced with the server * */ public boolean addName(String name, int status) SQLiteDatabase db = this.getWritableDatabase(); ContentValues contentValues = new ContentValues(); contentValues.put(COLUMN_NAME, name); contentValues.put(COLUMN_STATUS, status); db.insert(TABLE_NAME, null, contentValues); db.close(); return true; /* * This method taking two arguments * first one is the id of the name for which * we have to update the sync status * and the second one is the status that will be changed * */ public boolean updateNameStatus(int id, int status) SQLiteDatabase db = this.getWritableDatabase(); ContentValues contentValues = new ContentValues(); contentValues.put(COLUMN_STATUS, status); db.update(TABLE_NAME, contentValues, COLUMN_ID + "=" + id, null); db.close(); return true; /* * this method will give us all the name stored in sqlite * */ public Cursor getNames() SQLiteDatabase db = this.getReadableDatabase(); String sql = "SELECT * FROM " + TABLE_NAME + " ORDER BY " + COLUMN_ID + " ASC;"; Cursor c = db.rawQuery(sql, null); return c; /* * this method is for getting all the unsynced name * so that we can sync it with database * */ public Cursor getUnsyncedNames() SQLiteDatabase db = this.getReadableDatabase(); String sql = "SELECT * FROM " + TABLE_NAME + " WHERE " + COLUMN_STATUS + " = 0;"; Cursor c = db.rawQuery(sql, null); return c;
Handling Volley RequestQueue
We are going to use Volley for http request. So for this we will create a singleton class.
Create a class named VolleySingleton and write the following code.
package net.simplifiedcoding.androidmysqlsync; import android.content.Context; import android.graphics.Bitmap; import android.support.v4.util.LruCache; import com.android.volley.Request; import com.android.volley.RequestQueue; import com.android.volley.toolbox.ImageLoader; import com.android.volley.toolbox.Volley; /** * Created by Belal on 21/09/16. */ public class VolleySingleton private static VolleySingleton mInstance; private RequestQueue mRequestQueue; private static Context mCtx; private VolleySingleton(Context context) mCtx = context; mRequestQueue = getRequestQueue(); public static synchronized VolleySingleton getInstance(Context context) if (mInstance == null) mInstance = new VolleySingleton(context); return mInstance; public RequestQueue getRequestQueue() if (mRequestQueue == null) // getApplicationContext() is key, it keeps you from leaking the // Activity or BroadcastReceiver if someone passes one in. mRequestQueue = Volley.newRequestQueue(mCtx.getApplicationContext()); return mRequestQueue; public <T> void addToRequestQueue(Request<T> req) getRequestQueue().add(req);
Building Interface
MainActivity
Now inside activity_main.xml write the following code.
<?xml version="1.0" encoding="utf-8"?> <LinearLayout xmlns:android="http://schemas.android.com/apk/res/android" xmlns:tools="http://schemas.android.com/tools" android:id="@+id/activity_main" android:layout_width="match_parent" android:layout_height="match_parent" android:orientation="vertical" android:paddingBottom="@dimen/activity_vertical_margin" android:paddingLeft="@dimen/activity_horizontal_margin" android:paddingRight="@dimen/activity_horizontal_margin" android:paddingTop="@dimen/activity_vertical_margin" tools:context="net.simplifiedcoding.androidmysqlsync.MainActivity"> <LinearLayout android:layout_width="match_parent" android:layout_height="wrap_content" android:orientation="horizontal"> <EditText android:id="@+id/editTextName" android:layout_width="match_parent" android:layout_height="wrap_content" android:layout_weight="3" android:hint="Enter a name" /> <Button android:id="@+id/buttonSave" android:layout_width="wrap_content" android:layout_height="wrap_content" android:layout_weight="1" android:text="Save" /> </LinearLayout> <ListView android:id="@+id/listViewNames" android:layout_width="match_parent" android:layout_height="wrap_content"></ListView> </LinearLayout>
The above code will generate the following output.
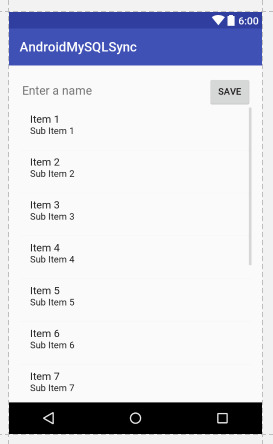
Android Sync SQLite Database with Server
As you can see we have an EditText, a Button and a ListView.
Now let me tell you what we are going to do. We will save the Name from EditText and we will also display the saved name in ListView with the Sync Status. So the next part is designing a layout for our Custom ListView.
ListView
Create an xml file inside layout directory. I have created names.xml.
<?xml version="1.0" encoding="utf-8"?> <RelativeLayout xmlns:android="http://schemas.android.com/apk/res/android" android:padding="@dimen/activity_horizontal_margin" android:layout_width="match_parent" android:layout_height="match_parent"> <TextView android:text="Name" android:layout_alignParentLeft="true" android:id="@+id/textViewName" android:layout_width="wrap_content" android:layout_height="wrap_content" /> <ImageView android:background="@drawable/success" android:layout_alignParentRight="true" android:id="@+id/imageViewStatus" android:layout_width="wrap_content" android:layout_height="wrap_content" /> </RelativeLayout>
As you can see we have a TextView to display the name and an ImageView to display the status.
Download the icons from the below link, we have two images to display queued or synced.
Icons Download (Android Sync SQLite Database with Server) (0 downloads)
(adsbygoogle = window.adsbygoogle || []).push();
You have to copy the downloaded icons inside drawable folder.
Building ListView
Model Class
Now create a class Name.java and write the following code.
package net.simplifiedcoding.androidmysqlsync; /** * Created by Belal on 1/27/2017. */ public class Name private String name; private int status; public Name(String name, int status) this.name = name; this.status = status; public String getName() return name; public int getStatus() return status;
Now we will create an Adapter for our ListView.
Adapter
Create a class NameAdapter.java and write the following code.
package net.simplifiedcoding.androidmysqlsync; import android.content.Context; import android.view.LayoutInflater; import android.view.View; import android.view.ViewGroup; import android.widget.ArrayAdapter; import android.widget.ImageView; import android.widget.TextView; import java.util.List; /** * Created by Belal on 1/27/2017. */ public class NameAdapter extends ArrayAdapter<Name> //storing all the names in the list private List<Name> names; //context object private Context context; //constructor public NameAdapter(Context context, int resource, List<Name> names) super(context, resource, names); this.context = context; this.names = names; @Override public View getView(int position, View convertView, ViewGroup parent) //getting the layoutinflater LayoutInflater inflater = (LayoutInflater) context.getSystemService(Context.LAYOUT_INFLATER_SERVICE); //getting listview itmes View listViewItem = inflater.inflate(R.layout.names, null, true); TextView textViewName = (TextView) listViewItem.findViewById(R.id.textViewName); ImageView imageViewStatus = (ImageView) listViewItem.findViewById(R.id.imageViewStatus); //getting the current name Name name = names.get(position); //setting the name to textview textViewName.setText(name.getName()); //if the synced status is 0 displaying //queued icon //else displaying synced icon if (name.getStatus() == 0) imageViewStatus.setBackgroundResource(R.drawable.stopwatch); else imageViewStatus.setBackgroundResource(R.drawable.success); return listViewItem;
Coding MainActivity
Now lets come inside MainActivity.java and write the following code.
package net.simplifiedcoding.androidmysqlsync; import android.Manifest; import android.app.ProgressDialog; import android.content.BroadcastReceiver; import android.content.Context; import android.content.Intent; import android.content.IntentFilter; import android.content.pm.PackageManager; import android.database.Cursor; import android.net.ConnectivityManager; import android.support.v4.content.ContextCompat; import android.support.v7.app.AppCompatActivity; import android.os.Bundle; import android.view.View; import android.widget.Button; import android.widget.EditText; import android.widget.ListView; import android.widget.Toast; import com.android.volley.AuthFailureError; import com.android.volley.Request; import com.android.volley.RequestQueue; import com.android.volley.Response; import com.android.volley.VolleyError; import com.android.volley.toolbox.StringRequest; import com.android.volley.toolbox.Volley; import org.json.JSONException; import org.json.JSONObject; import java.util.ArrayList; import java.util.HashMap; import java.util.List; import java.util.Map; public class MainActivity extends AppCompatActivity implements View.OnClickListener /* * this is the url to our webservice * make sure you are using the ip instead of localhost * it will not work if you are using localhost * */ public static final String URL_SAVE_NAME = "http://192.168.1.107/SqliteSync/saveName.php"; //database helper object private DatabaseHelper db; //View objects private Button buttonSave; private EditText editTextName; private ListView listViewNames; //List to store all the names private List<Name> names; //1 means data is synced and 0 means data is not synced public static final int NAME_SYNCED_WITH_SERVER = 1; public static final int NAME_NOT_SYNCED_WITH_SERVER = 0; //a broadcast to know weather the data is synced or not public static final String DATA_SAVED_BROADCAST = "net.simplifiedcoding.datasaved"; //Broadcast receiver to know the sync status private BroadcastReceiver broadcastReceiver; //adapterobject for list view private NameAdapter nameAdapter; @Override protected void onCreate(Bundle savedInstanceState) super.onCreate(savedInstanceState); setContentView(R.layout.activity_main); //initializing views and objects db = new DatabaseHelper(this); names = new ArrayList<>(); buttonSave = (Button) findViewById(R.id.buttonSave); editTextName = (EditText) findViewById(R.id.editTextName); listViewNames = (ListView) findViewById(R.id.listViewNames); //adding click listener to button buttonSave.setOnClickListener(this); //calling the method to load all the stored names loadNames(); //the broadcast receiver to update sync status broadcastReceiver = new BroadcastReceiver() @Override public void onReceive(Context context, Intent intent) //loading the names again loadNames(); ; //registering the broadcast receiver to update sync status registerReceiver(broadcastReceiver, new IntentFilter(DATA_SAVED_BROADCAST)); /* * this method will * load the names from the database * with updated sync status * */ private void loadNames() names.clear(); Cursor cursor = db.getNames(); if (cursor.moveToFirst()) do Name name = new Name( cursor.getString(cursor.getColumnIndex(DatabaseHelper.COLUMN_NAME)), cursor.getInt(cursor.getColumnIndex(DatabaseHelper.COLUMN_STATUS)) ); names.add(name); while (cursor.moveToNext()); nameAdapter = new NameAdapter(this, R.layout.names, names); listViewNames.setAdapter(nameAdapter); /* * this method will simply refresh the list * */ private void refreshList() nameAdapter.notifyDataSetChanged(); /* * this method is saving the name to ther server * */ private void saveNameToServer() final ProgressDialog progressDialog = new ProgressDialog(this); progressDialog.setMessage("Saving Name..."); progressDialog.show(); final String name = editTextName.getText().toString().trim(); StringRequest stringRequest = new StringRequest(Request.Method.POST, URL_SAVE_NAME, new Response.Listener<String>() @Override public void onResponse(String response) progressDialog.dismiss(); try JSONObject obj = new JSONObject(response); if (!obj.getBoolean("error")) //if there is a success //storing the name to sqlite with status synced saveNameToLocalStorage(name, NAME_SYNCED_WITH_SERVER); else //if there is some error //saving the name to sqlite with status unsynced saveNameToLocalStorage(name, NAME_NOT_SYNCED_WITH_SERVER); catch (JSONException e) e.printStackTrace(); , new Response.ErrorListener() @Override public void onErrorResponse(VolleyError error) progressDialog.dismiss(); //on error storing the name to sqlite with status unsynced saveNameToLocalStorage(name, NAME_NOT_SYNCED_WITH_SERVER); ) @Override protected Map<String, String> getParams() throws AuthFailureError Map<String, String> params = new HashMap<>(); params.put("name", name); return params; ; VolleySingleton.getInstance(this).addToRequestQueue(stringRequest); //saving the name to local storage private void saveNameToLocalStorage(String name, int status) editTextName.setText(""); db.addName(name, status); Name n = new Name(name, status); names.add(n); refreshList(); @Override public void onClick(View view) saveNameToServer();
Now if you will run the application it will save the name to MySQL and SQLite with the sync or unsynced status.
But to send the unsynced names to the server automatically we have to detect the Network Status of the phone. For this we need one more broadcast receiver.
Detecting Network State
Creating Broadcast Receiver
Create a class named NetworkStateChecker.java and write the following code.
package net.simplifiedcoding.androidmysqlsync; import android.content.BroadcastReceiver; import android.content.Context; import android.content.Intent; import android.database.Cursor; import android.net.ConnectivityManager; import android.net.NetworkInfo; import com.android.volley.AuthFailureError; import com.android.volley.Request; import com.android.volley.Response; import com.android.volley.VolleyError; import com.android.volley.toolbox.StringRequest; import org.json.JSONException; import org.json.JSONObject; import java.util.HashMap; import java.util.Map; /** * Created by Belal on 1/27/2017. */ public class NetworkStateChecker extends BroadcastReceiver //context and database helper object private Context context; private DatabaseHelper db; @Override public void onReceive(Context context, Intent intent) this.context = context; db = new DatabaseHelper(context); ConnectivityManager cm = (ConnectivityManager) context.getSystemService(Context.CONNECTIVITY_SERVICE); NetworkInfo activeNetwork = cm.getActiveNetworkInfo(); //if there is a network if (activeNetwork != null) activeNetwork.getType() == ConnectivityManager.TYPE_MOBILE) //getting all the unsynced names Cursor cursor = db.getUnsyncedNames(); if (cursor.moveToFirst()) do //calling the method to save the unsynced name to MySQL saveName( cursor.getInt(cursor.getColumnIndex(DatabaseHelper.COLUMN_ID)), cursor.getString(cursor.getColumnIndex(DatabaseHelper.COLUMN_NAME)) ); while (cursor.moveToNext()); /* * method taking two arguments * name that is to be saved and id of the name from SQLite * if the name is successfully sent * we will update the status as synced in SQLite * */ private void saveName(final int id, final String name) StringRequest stringRequest = new StringRequest(Request.Method.POST, MainActivity.URL_SAVE_NAME, new Response.Listener<String>() @Override public void onResponse(String response) try JSONObject obj = new JSONObject(response); if (!obj.getBoolean("error")) //updating the status in sqlite db.updateNameStatus(id, MainActivity.NAME_SYNCED_WITH_SERVER); //sending the broadcast to refresh the list context.sendBroadcast(new Intent(MainActivity.DATA_SAVED_BROADCAST)); catch (JSONException e) e.printStackTrace(); , new Response.ErrorListener() @Override public void onErrorResponse(VolleyError error) ) @Override protected Map<String, String> getParams() throws AuthFailureError Map<String, String> params = new HashMap<>(); params.put("name", name); return params; ; VolleySingleton.getInstance(context).addToRequestQueue(stringRequest);
Adding Receiver in Manifest
Add the following code in your AndroidManifest.xml file inside application tag.
<receiver android:name=".NetworkStateChecker"> <intent-filter> <action android:name="android.net.conn.CONNECTIVITY_CHANGE" /> </intent-filter> </receiver>
Registering Receiver
You also need to register the receiver. So add the following line inside onCreate() method of your MainActivity.java file.
registerReceiver(new NetworkStateChecker(), new IntentFilter(ConnectivityManager.CONNECTIVITY_ACTION));
Now you can run your application.
Testing the Application
Run your application. And try saving the name when internet is available also turn off the internet and again try saving your name.
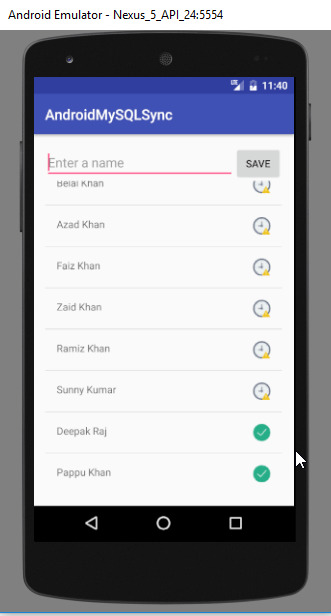
Android Sync SQLite Database with Server
When the internet will be available again the data will be automatically sent to MySQL.
Download Source Code
You can get the source code from the following GitHub repository.
Android Sync SQlite Database with Server Source Code
So thats it for this android sync sqlite database with server tutorial friends. Feel free to leave your comments if you are having any troubles making the project. Also follow the steps carefully as the post is very long. And if you found this helpful please favor us by sharing this post in your social network. Thank You 🙂
0 notes
Text
Top 10 Most Common Mistakes That Android Developers Make: A Programming Tutorial
Common Mistake #1: Developing for iOS To my great pleasure, this Android mistake is far less common nowadays (partially because clients are beginning to realize that the days when Apple was setting all the design standards are long gone). But still, every now and then, we see an app that is an iOS clone.
Don’t get me wrong, I’m not an Android programming evangelist! I respect every platform that moves the mobile world a step forward. But, it’s 2014 and users have been using Android for quite a while now, and they’ve grown accustomed to the platform. Pushing iOS design standards to them is a terrible strategy!
Unless there is a super good reason for breaking the guidelines, don’t do it. (Google does this all the time, but never by copy-pasting.)
Here are some of the most common examples of this Android mistake:
You should not be making static tabs, and they don’t belong on the bottom (I’m pointing at you Instagram). System notification icons should not have color. App icons should not be placed inside a rounded rectangle (unless that’s your actual logo ex. facebook). Splash screens are redundant beyond the initial setup/introduction. Do not use them in other scenarios. Lists should not have carets. These are just a few of the many other small things that can ruin the user experience.
Common Mistake #2: Developing for Your Android Device Unless you are building a kiosk/promo app for a single tablet, chances are your Android app won’t look good on every device. Here are a few Android programming tips to remember:
Density-independent pixels (dp) are different than normal pixels (px). Resources are included multiple times to account for different densities and orientations. 9-patch drawables are stretched to fit the screen. There are literally thousands of possible scenarios, but after a while you develop a sense for covering them all with a handful of cases.
You don’t own thousands of devices? Not a problem. The Android Emulator is super good in replicating physical devices. Even better, try out Genymotion, it’s lightning fast and comes with a lot of different popular preset devices.
Also, have you tried rotating your device? All hell can break loose…
Common Mistake #3: Not Using Intents Intents are one of Android’s key components. It’s a way of passing data between different parts of the app or, even better, different apps on the system.
Let’s say you have a gallery app that can share a download link to some images via SMS. Which of the two options seems more logical?
Option 1:
Request the SEND_SMS permission.
<uses-permission android:name="android.permission.SEND_SMS" /> Write your own code for sending SMS using the SmsManager. Explain to your users why your gallery app needs access to services that can cost money, and why they have to grant this permission to use your app. Option 2:
Start an SMS Intent and let an app designed for SMS do the work
Intent sendIntent = new Intent(Intent.ACTION_VIEW); sendIntent.setData(Uri.parse("sms:" + telephoneNumber)); sendIntent.putExtra("sms_body", x); startActivity(sendIntent); In case that you have any doubts, best solution is option 2!
This approach can be applied to almost anything. Sharing content, taking pictures, recording video, picking contacts, adding events, opening links with native apps, etc.
Unless there is a good reason to make a custom implementation (ex., a camera that applies filters), always use Intents for these scenarios. It will save you a lot of programming time, and strip the AndroidManifest.xml of unnecessary permissions.
Common Mistake #4: Not Using Fragments A while ago in Honeycomb, Android introduced the concept of fragments. Think of them as separate building blocks with their own (rather complex) life cycles that exist inside an Activity. They help a lot with optimizing for various screens, they are easily managed by their parent activity, can be reused, combined and positioned at will.
Launching a separate activity for each app screen is terribly inefficient, since the system will try to keep them in memory as long as it can. Killing one won’t free the resources used by the others.
This Android programming tutorial recommends the proper use of fragments to make your app more efficient.
Unless you want to dig deep into the Android core and read this article, advocating against fragment usage, you should use fragments whenever possible. It basically says that fragments and cursor loaders have good intended purpose, but poor implementation.
Common Mistake #5: Blocking the Main Thread The main thread has a single purpose: keeping the user interface responsive.
Although the science behind measuring the frame rate our eyes/brain can perceive is complex and influenced by a lot of factors, a general rule is that anything below 24 fps with delay greater than 100 ms won’t be perceived as smooth.
This means that the user’s actions will have a delayed feedback, and the Android app you have programmed will stop responding. Stripping the user of his control over the app leads to frustration, frustrated users tend to give very negative feedback.
Even worse, if the main thread is blocked for a while (5 seconds for Activities, 10 for Broadcast Receivers), ANR will happen.
As you learn Android programming, you will come to know and fear this message. Follow these Android programming tips to minimize this occurrence.
This was so common in Android 2.x, that on newer versions the system won’t let you make network calls in the main thread.
To avoid blocking the main thread, always use worker/background threads for: 1. network calls 2. bitmap loading 3. image processing 4. database querying 5. SD reading / writing
Common Mistake #6: Reinventing the Wheel “OK, I won’t use the main thread. I’ll write my own code that communicates with my server in a background thread.”
No! Please don’t do that! Network calls, image loading, database access, JSON parsing, and social login are the most common things you do in your app. Not just yours, every app out there. There is a better way. Remember how Android has matured and grown as a platform? Here’s a quick list of examples:
Use gradle as a build system. Use Retrofit / Volley for network calls. Use Picasso for image loading. Use Gson / Jackson for JSON parsing. Use common implementations for social login. If you need something implemented, chances are it’s already written, tested and used widely. Do some basic research and read some Android programming tutorials before writing your own code!
Common Mistake #7: Not Assuming Success Great. We have learned that there is a better way for handling long running tasks, and we are using well documented libraries for that purpose. But the user will still have to wait. It’s inevitable. Packages are not sent, processed and received instantly. There is a round trip delay, there are network failures, packages get lost, and dreams get destroyed.
But all this is measurable. Successful network calls are far more likely than unsuccessful ones. So why wait for server response before handling the successful request? It’s infinitely better to assume success and handle failure. So, when a user likes a post the like count is immediately increased, and in unlikely event that the call failed, the user is notified.
In this modern world immediate feedback is expected. People don’t like to wait. Kids don’t want to sit in a classroom obtaining knowledge that has uncertain future payoff. Apps must accommodate to the user’s psychology.
Common Mistake #8: Not Understanding Bitmaps Users love content! Especially when the content is well formatted and looks nice. Images, for instance, are extremely nice content, mainly due to their property of conveying a thousand words per image. They also consume a lot of memory. A lot of memory!
Before an image is displayed on the screen, it has to be loaded into the memory. Since bitmaps are the most common way to do this, we’re going to provide an Android programming guide for the whole process:
Let’s say you want to display an image on your screen that you just took with your camera. The total memory needed for this is calculated with the following formula: memory_needed_in_bytes = 4 * image_width * image_height;
Why 4? Well, the most common / recommended bitmap configuration is ARGB_8888. That means that for each pixel we draw, we need to keep 8 bits (1 byte) for the alpha, the red, the greed and the blue channel in memory, in order to properly display it. There are alternatives, like the RGB_565 configuration that requires half the memory than ARGB_8888, but loses the transparency and the color precision (while maybe adding a green tint).
Let’s assume you have a brand new device with full HD screen and 12 MP camera. The picture you just took is 4000x3000 pixels large and the total memory needed to display it is: 4 bytes * 4000 * 3000 = 48 MB
48 megabytes of your RAM just for a single image!? That’s a lot!
Now let’s take the screen resolution into consideration. You are trying to show a 4000x3000 image on a screen that has 1920x1080 pixels, in worst case scenario (displaying the image full screen) you shouldn’t allocate more than 4 * 1920 * 1080 = 8.3 MB of memory.
Always follow the Android programming tips for displaying bitmaps efficiently:
Measure the view you’re showing your images in. Scale / crop the large image accordingly. Show only what can be displayed. Common Mistake #9: Using Deep View Hierarchy Layouts have an XML presentation in Android. In order to draw content, the XML needs to be parsed, the screen needs to be measured, and all the elements need to be placed accordingly. It’s a resource- and time-consuming process that needs to be optimized.
This is how the ListView (and more recently the RecyclerView) works.
If a layout has been inflated once, the system reuses it. But still, inflating the layout must happen at some point.
Let’s say you want to make a 3x3 grid with images. One way of doing this is a vertical LinearLayout containing 3 LinearLayouts with equal weight, each of them containing 3 ImageViews with equal weight.
Some Android programming beginners don’t always make the best use of LinearLayouts.
What do we get with this approach? A warning that “nested weights are bad for performance”.
There is a saying in the Android programming world, that I just made up: “With little effort all hierarchy can be flattened”.
In this case RelativeLayout or GridLayout will efficiently replace the nested
Common Mistake #10: Not Setting the minSdkVersion to 14 Well, this is not a mistake, but it is bad practice.
Android 2.x was a huge milestone in developing this platform, but some things should be left behind. Supporting older devices adds more complexity for code maintenance and limits the development process.
The numbers are clear, the users have moved on, the developers shouldn’t stay behind.
I’m aware that this doesn’t apply for some big markets with old devices (ex. India), and setting the minSdkVersion to 14, on the Facebook App, means leaving couple of million users without their favorite social network. But, if you are starting fresh and trying to create a beautiful experience for your users, do consider eliminating the past. Users that don’t have the resources, or feel the need to upgrade their device/OS, won’t have the incentive to try out a superior version of your Android app and ultimately spend money on it.[Source]-https://www.toptal.com/android/top-10-most-common-android-development-mistakes
0 notes
Link
Kotlin Android App Development with Android Q by building real apps. Beginner to advanced + Kotlin for Android
What you’ll learn
You will learn how to install tools
You will learn Kotlin for Android
You will learn how to develop Android apps
You will learn how to Implement 4 real apps
You will learn how to use database in your apps
You will learn how to publish your apps on Google Play
1- Installing and Setting Up Tools
Introcucing tools (IDE + Android SDK + Emulator + JDK)
How to download and install required tools
Creating a new Android Studio project
How to change the font of code editor
What is an activity
What is androidmanifest file
Developing your first Android app
Attributes panel
Code completion list
Displaying a toast
Running your app on an emulator
Examining different parts of an emulator
Send sms and phone calls between two emulators
Enabling directional pad
Cloud-based testing
Installing Google USB driver
Enabling developr options
Connecting a real device to the Android Studio
2- Kotlin _ Say Hello to Basics
Int data type
Declaring and initializing variables
Single line comment
var vs val
print() function
Floating point data type
Boolean data type
String data type
Type inference system
Naming conventions (Camel Case)
Data member and function member
dec() function
compareTo() function
Intellisence
Argument
replace(string) function
replace(char) function
char data type
toInt() function
toIntOrNull() function
NumberFormatException
toFloatOrNull() function
What is Null?
Kotlin Nullable types
Arithmetic operators
Operator precedence
Assignment operators
readLine() function
3- App ( Tip Calculator ) + Android Basic Views
TextView
Seekbar
EditText
Button
Set constraints for views
Resolving the “Hardcoded strings” warning
Converting text to number
Working with seekbar’s listeners (setOnSeekBarChangeListener)
Concatenating strings, variables and expressions with the + operator
Concatenating strings, variables and expressions with String Templates
4- Kotlin _ Control Flow
If expression
If Else expression
Relational operators
Gutter area
Debugging the apps by using breakpoints
Transfer of control
How to check if a numbers is even or odd
Logcat tab
Toast messages
Statement vs Expression
lift out assignment
Any data type
When expression with arg
When vs If
When expression without arg
Combining concitions in a when expression
An app that determines if a number is prime number
How to hold a range of values (double dotted and in operators)
Using the when expression with ranges
Logical AND operator
Useful Android Studio shortcut keys
Defining range variables
5- Kotlin _ Functions
Simple functions
Functions with Parameters
Functions with return type
Function signature
Parameter vs Argument
Userful Android Studio shortcut keys
Multi line comment
6- Kotlin _ Immutable and Mutable Collections + Loops
Defining and initializing the Arrays
Using the arrays
Manipulating the array elements
Any data type
ArrayIndexOutOfBound exception
Data types and performance
How to define an array type explicitly
The second way of declaring and initializing an array
Iterating over arrays by using the for loop
Destructuring declaration
Iterate through a Range
How to get the numbers of an array elements
withIndex() function
Until keyword
listOf() function
mutableListOf() funciton
Array vs Collection
mutable vs immutable
7- Kotlin _ Classes + Enums + Exception Handling
Declaring classes
How to create objects
Constructors
Iterating through an array of objects
Vertical selection
Property and method
Class header
Primary constructor
Declaring properties from the primary constructor
Class diagram
How Enums make things easier
Happy path
Try Catch block
Multiple catch blocks
Finally block
8- App ( English Stories ) + Activities + List View + Singleton Pattern
Displaing data into a Listview
ListView click listener
How to creating a new Activity
Passing data between activities
Scrolling toolbar
How to set the start up Activity
FAB (Floating Action Button)
Snakbar
Singleton pattern
Private visibility modifier
Public visibility modifier
Overriding the functions
String controls characters
9- App ( My Notes ) + SQLite Database + Activity Life Cycle + Action Bar + Alert Dialog
Set the Margin attribute for views
Designing SQLite databases for Android apps (Fields, Records, Tables, …)
Extending classes
SQLiteOpenHelperClass
TODO() functions
NullPointerException
Check null values
Safe call operator
Not null assertion operator
Using readble connetions to read data from database
Using writable connections to write data to database
OnDestroy() funciton
Performance tune-up while working ith databases
Variables’ scope
Up button
<Meta Data> tag
How to add menu to Action Bar
Working with Asset studio
Refactoring resource names
XML namespaces
match-constraint attribute
Hint attribute
Setting EditText text attribute
Changing the EditText focus programatically
How to check if an EditText is empty
Inserting new records into the database
Up button vs Back button
Activity life cycle
Navigating clipboard items
Refactoring functions
How to close an Activity programatically
Alert Dialog
Updating and Deleting records from database
10- App ( Best Quotes ) + Recycler View +Card View + Intents + Guidelines + Unicode Characters
How to insert default values into the database
Designing layouts by using a Card View
Linear Layout
Image View
Layout Margin attribute
Writing a customized Adapter for Recycler View
Recycler View vs List View
Inner classes
findViewByID() function
Arranging and managing Recycler View items by using LayoutManager
Using the customized Adapter View
Passing functions in Kotlin as parameters
Guidelines in constraint layout
On item click listener for RecyclerView
Creating DB in memory
Explicit intent and Implicit intent
Ripple effect
Share data with other apps
11- App ( Animating a Spaceship + Best Quotes ) + Animation in Android + Splash Screen
Alpha animation
Translate animation
Rotate animation
Scale animation
Companion objects
Creating Splash Screens by using Lottie library
Using third-party libraries
Assets folder
Application context vs the this keyword
noHistory attribute
12- Publishing Your App
Parallex effect
Safe zone
Legacy icons
Adaptive icons
Debug key vs Release key
Signing the APK
Requirements
No, tools are free
The concepts start from scratch
All you need is a computer
You even don’t need an Android device. Because in this course, you’ll learn how to create emulators.
Description
* In this course, you will learn how to write Android apps from scratch.
* No prerequisite is required.
* The obvious point about this course is that it is exercise-based to make sure you will understand and use the course materials correctly.
* Also, we will use the latest version of Android Studio, because it has many changes in recent mouths.
Who this course is for:
Everyone who thinks about an Android application idea and eagers to turn it into a business
College students
Those who wants to learn the newest programming language (Kotlin)
Android developers that want to update their knowledge about Android SDK
Created by Dev Hive Last updated 7/2019 English English
Size: 6.08 GB
Download Now
https://ift.tt/2jSX0cN.
The post Android Q App Development with Kotlin: Beginner to Advanced appeared first on Free Course Lab.
0 notes